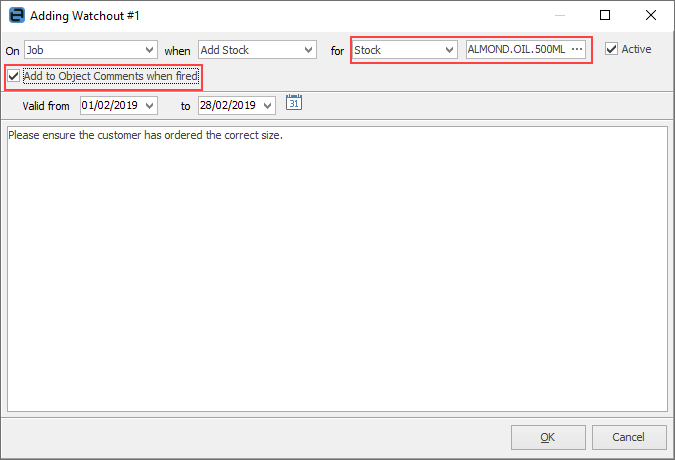
A new watchout can be added in either of these ways: from the Watchouts list selected by Tools > Watchouts on the ribbon or from the Watchouts tab on a specific object displaying the tab in the footer.

Because a watchout is dynamic, appearing only when triggered by a particular event, it is necessary to set the parameters for how the watchout will work.

Showing choices for On Job – the final field would be for stock select
This is performed by:
1.Choosing which object the watchout is to appear on, eg. job, quote, etc.
2.Selecting when the event within that object will trigger the watchout, eg. when Cust# changes, Ship# changes, etc.
3.Selecting the date when this watchout is valid from/to. (This is optional, so may be left blank).
The drop down choices available in the When and For fields will depend on which On is selected, as shown here.
Job |
Quote |
PO* |
RTV* |
RFC* |
Project |
Selected Event |
Watchout will display when... |
|---|---|---|---|---|---|---|---|
|
|
|
|
|
|
Add |
A new job, quote, purchase order, RTV, RFC or project is added. |
|
|
|
|
|
|
Cust# changes |
The Cust# changes on a job, quote, RFC or project. |
|
|
|
|
|
|
Vend# changes |
A purchase order or RTV Vend# is changed. |
|
|
|
|
|
|
From# changes |
The From# changes on a job, quote, purchase order or RTV. |
|
|
|
|
|
|
Ship# changes |
The Ship# changes on a job, quote, purchase order or project. |
|
|
|
|
|
|
Item# changes |
The Item# changes on a job, quote or project. |
|
|
|
|
|
|
Receive purchase order |
The purchase order is taken to Received status. |
|
|
|
|
|
|
Finish |
A job, quote, purchase order, RTV, RFC or project is finished. |
|
|
|
|
|
|
Invoice |
A job is invoiced. |
|
|
|
|
|
|
Add Stock |
Stock is added to a job, quote, purchase order, RTV, RFC or project. |
|
|
|
|
|
|
Add Billing Job |
A billing job is added to a project. |
|
|
|
|
|
|
Add Service Job |
A service job is added to a project. |
|
|
|
|
|
|
Add Consumable Job |
A consumable job is added to a project. |
PO = Purchase Order. RTV = return to vendor. RFC = Return From Customer.

Ticking the Add to Object Comments when fired will automatically log that watchout to the related object, allowing an audit trail that the watchout was fired, when and by whom.
When adding from within a cardfile, project, Item or stock, the for details (highlighted in the above example) are filled in automatically. These fields must be completed manually when entering a watchout from the Tools menu, or from some other objects.
Displaying watchouts based on dates
When adding or editing a watchout, specify dates this watchout is to be valid for if required. Specify either the Valid From or Valid To date, or both, allowing the watchout to be displayed during this period. This can be extremely useful for timed events such as catalogue releases, price change reminders, etc.
Further information
