The product specification system brings the following benefits:
▪Product Filtering on category pages
▪Product Comparisons
▪Product information
▪Ribbons applied via conditions
▪Banner Sliders targeting via conditions.
Products with product specifications that are planned to be filtered need to have specific options in place so they can be listed on the filtering screen. |
These attributes are not linked to options. Every product can have its own text information about the specification that will be used when viewing the product and comparisons. These will not show up in filters and cannot be used as conditions, except for the existence of the specification itself (not its content).
A single option always needs to be present on the specification attribute to make the specification active (viewable in the system). |
It is important to review the different types of products you have and consider what type of specifications you would like to show your customers. Here are some considerations. ▪Calls from customers: –What are the main questions asked about products in different categories? –Do they ask for a link to more information from the manufacturer (a hyperlink specification can handle this)? ▪Category replacement: Will this category be repeated in the system? Is it something like a material where a searchable specification can be used to replace it? ▪Product Searching – A way to make it easier for your customers to find products using filters. ▪Ribbons on products to indicate information: –Ability to show special ribbons on products to show specific information. –Show a general ribbon if the specification is assigned to the product (does not require more than one option).
See here for product specifications strategy. |
To start setting up attributes for your products, go to the Admin section > Catalog> Attributes> Specification Attributes area. From there you can view/edit the list of existing attributes, add attribute groups, and new attributes.
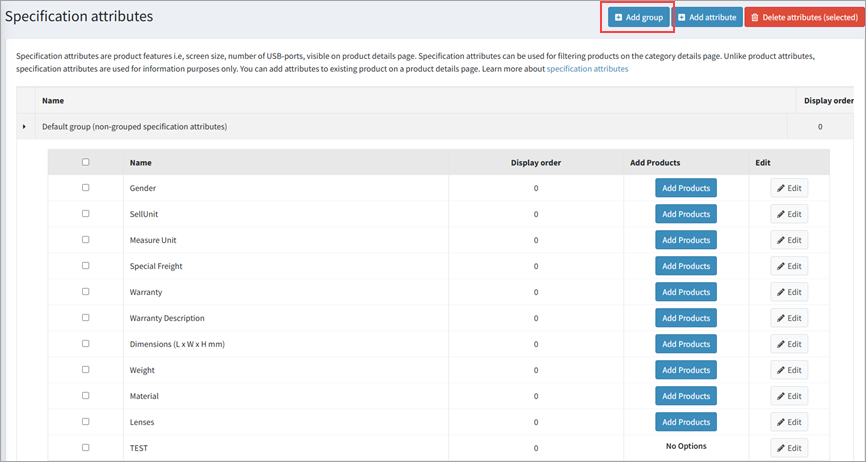 |
Attributes can be to a group optionally. If you plan to use an extensive range of attributes, it is a good idea to group them. This helps organise attributes on the admin side, and also provides group titles on filters and specification tables for end users.
To add a group select the Add group button and type in the group name (it is easy to change this name at a later time, if necessary). |
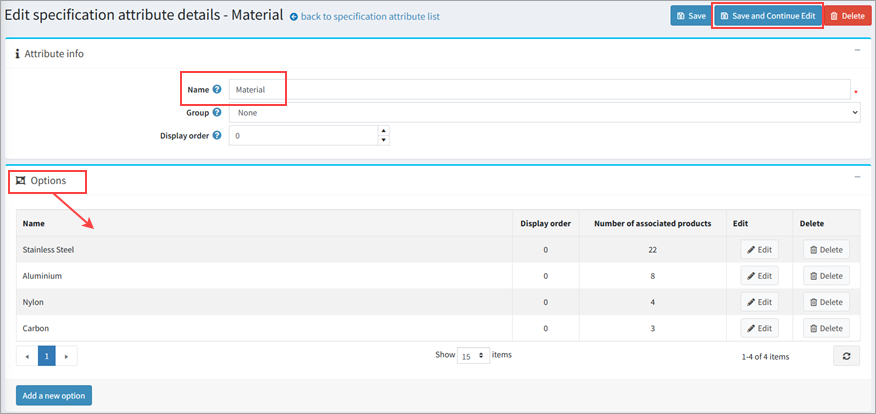
An attribute is an object in the system that is linked to attribute options (if not sure you can start without groups and easily add them later). The first step is to add an attribute via the Add Attribute button in the Specification Attributes screen. Enter the name of the specification attribute, then select Save and continue edit. At this point it is best to then add at least one Option (in the lower section of the attribute dialog screen).
 |
Product specifications can be added directly to a product via Admin> Catalog > Product edit screen. From there scroll down to the Specification attributes section .
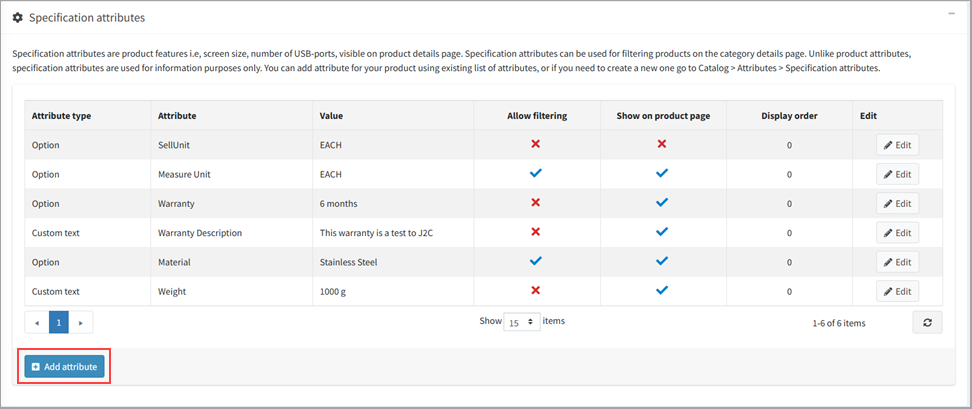
Attributes can be added to the system and existing attributes can be individually edited.
When adding in a new attribute via the Add attribute button, a new dialog appears asking what type of attribute you would like to place. If you want the attribute to be filterable, the Option type needs to be selected. Below is an example of a filterable Material attribute being added. When a customer looks for a product that is made of stainless steel, they will find this product listed because it is assigned to the Stainless Steel attribute.
 |
 Using Add Products to bulk upload an attribute to products
Attributes can be assigned to products in bulk using Add Products to. This can be done using input screens or through importing data in an Excel file.
 |
Products can be directly searched for using category and keyword search criteria. This allows the user to form a list of products they wish to assign to an attribute. The search results show below along with a bulk attribute allocation dialog.
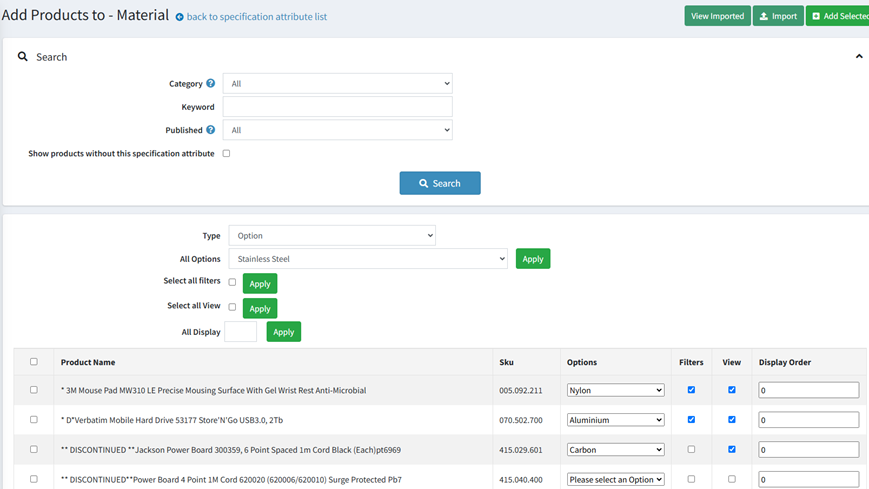
The dialog allows you to assign to the product list in bulk the following: ▪Type (option or text style specification) ▪Show all the options for the attribute that was selected from the initial attribute list (If the option type was selected) ▪Show specific text input screens for the non-filterable types such as custom text, custom HTML text and hyperlink ▪Ability to allocate filter and view checkboxes for all listed products. ▪Ability to allocate a Display order value for the specifications.
By selecting one of these and the corresponding Apply”button, the setting is bulk allocated to the product list below. If you select a different type, the dialog in the form will change to match the data that type can accept. The table below shows the types and their values.
|
When selecting Option Type, the specification can be filtered and linked to the options added in the database. As shown in figure 7 below a filters field shows and bulk allocation of existing options can be assigned to the selected products.
 |
Custom text changes the dialog to have a text entry added as the product specification. A simple value field is provided for entry. The filter functionality is removed.
 |
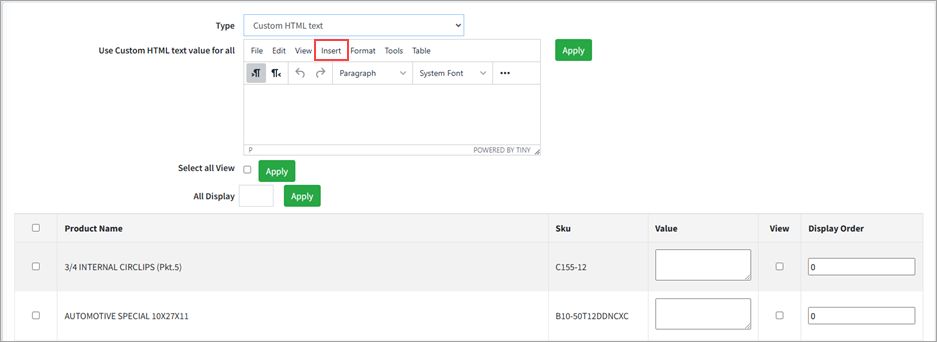
This type can handle more complex formatted data, including tables (in HTML). The dialog provides a rich text editor that makes it easy to format the text (font, sizing, colours). The insert menu item allows for the insertion of images and tables. This information will be presented in the product specifications table when viewed by the customer. This is not a filterable type.
 |
This can be allocated to products. The entry input is a single field. When displayed to the customer it functions as a hyperlink to an internal or external website. This is not filterable.
 |
Import from Excel is part of the bulk input specification’s function. The import step is used instead of the initial product search function described above. In addition to this, it allows users to also import specific details per product (options or text based).
The advantage of using an Excel import file is that a more complex product list, along with variable attribute settings, can be allocated in one go. The Excel spreadsheet could also be generated from Jim2 stock lists.
Product Specification templates screen 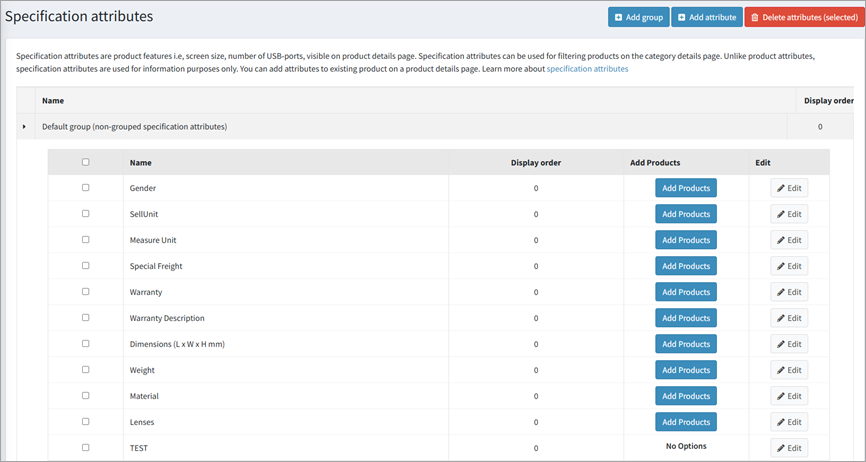
This is the entry point to import an Excel spreadsheet. If you see the No Options message instead, click Edit and add at least one option for the specification This is required even if you plan to use text based options).
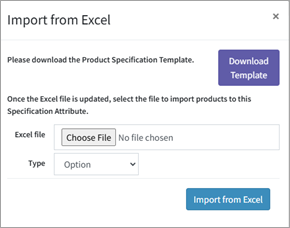
The import function is very flexible: it can be initiated with only a column representing SKUs, or containing all the details required to add in the specifications. Users can obtain a Download Template, which gives all the fields that can be used in the import.
The table shows the fields that will be presented in a downloadable template.
This template will be a static Excel preset file to start with. These fields represent the specification data that can be imported into the system. The first field representing the SKU is the only required field. This is because the global option or value can be set and applied to all products (or individually).
 |
The import function has been designed to handle large data sets (over 500 products). This can take a while when uploading. This is run as a background task so as not to lock up the screen of the user. Once the import is complete, a notification will appear stating that has been successfully imported. Once the View Imported hyperlink is selected, a screen showing all the imported data will appear.

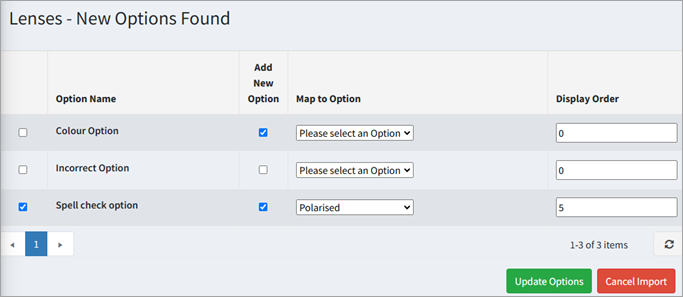
If the option type is selected and options mismatch between the imported data and Jim2Commerce, an Options import dialog will appear. |
When using the option type on the import dialog, the system tries to match the imported with the options already existing in the system. If there are no matching options in the system, a secondary dialog appears that is used to either add the options in as new or match them to existing options. All options have to be assigned to either an existing option (mapping) or a new option. The dialog will not continue until all options are allocated. This ensures that all uploaded products will have a match.
|
The product list will show in the same way as the bulk product specification screen described above. Depending on which fields in the import template were filled, the data will be populated per product. Any fields not imported through the spreadsheet can be updated. The Apply functions as option or text information, filter or view, along with display order can be allocated. Otherwise, information can also be directly input per product.
In the image below, data has been imported. Update tools can be seen to the top left with the Type locked in for the import. Import statistics show on the top right ,giving an idea of the success of the import (in this example 100 products did not match Jim2Commerce and were rejected). A list of the imported products shows below. The interface allows for further changes before allocating specifications to the products.
 |
Further information
