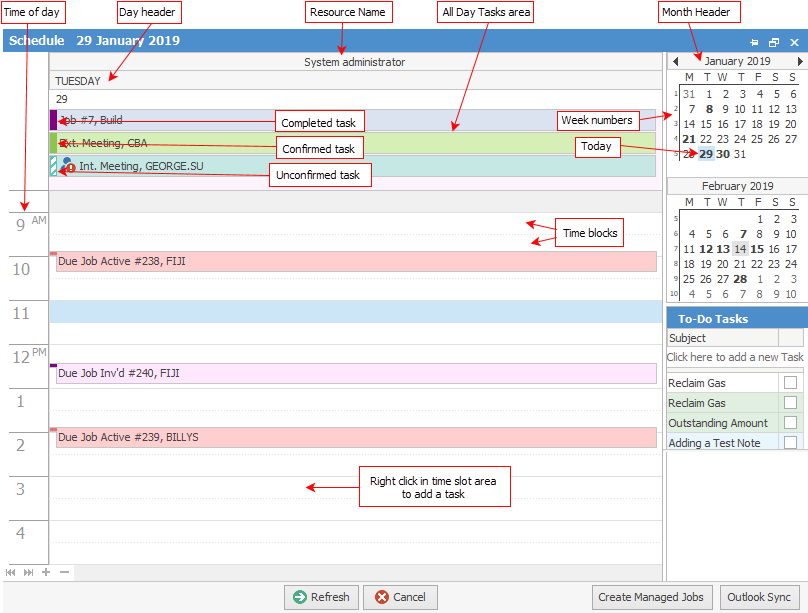
The scheduling area is where tasks can be added, viewed, edited or moved. The layout of the Schedule screen is defined by options selected in the ribbon area.

Day is the default view mode when the Schedule is first opened. This view enables user events in the scheduling area to be displayed or scheduled on a day-by-day basis, or by a number of days.
The scheduling area consists of time blocks, which are used to schedule user events. Time blocks outside of normal working hours are displayed in a darker colour than those in normal working hours.
Days containing working hours are workdays. Working hours reflect the working hours set in Tools > Options > General. Together, the days and working hours make up a work week.
The left side of the scheduling area is occupied by the Time of day column, which displays the relevant time of a time block or blocks. The current time is indicated by a the large blue arrow. The default time scale for this column can be set, or changed in Tools > Options > Schedule. This default value can be temporarily overridden by right clicking in the Time of day column and selecting from 5, 6, 10, 15, 30 or 60 minute intervals. The view will return to the predefined time scale the next time the Schedule screen is opened.
|
The Time of Day column is only displayed when in the Day, Work Week or Current +7 view. |
|
When a task is scheduled for a time period that is above or below the visible area currently onscreen, an arrow, either
The same scroll button appears when the user task is outside of the day's cell, when working under the Work Week, Week, Year, Time Line or Current +7 (days) view. |

Further information:


 or
or  appears in the Time of day column to indicate the direction of that invisible entry.