
During the initial setup, stock codes are allocated to bins, and the existing stock is transferred into these bins in one process called Stock Transfer – Warehouse Setup.
|
Depending on the number of stock codes and the warehouse layout, this can be a daunting task that needs some thought and concentration. It is advisable to draw up a plan to have a clear concept of stock locations before attempting this phase of the implementation. The plan is a map of the warehouse, showing the stock code(s) stored in each bin. More than one stock code can be stored in a bin. |

This process involves 3 steps:
1.Add a stock transfer.
On the ribbon go to Stock > Stock Transfer > Add.
|
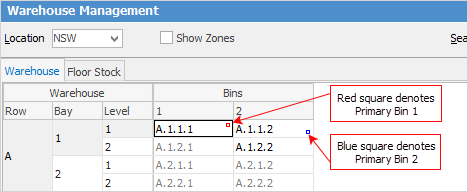
Once stock has been allocated to bins, within Warehouse Management a small red or blue square in the top right corner of the bin, denotes this is primary bin.
 |
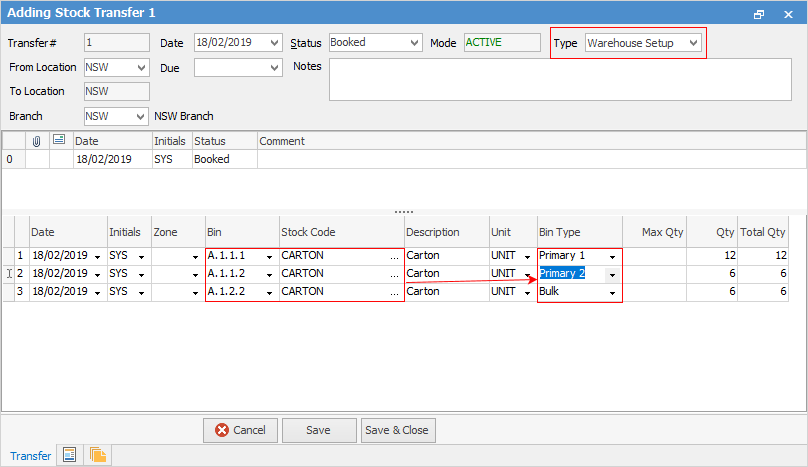
▪Change the Type to Warehouse Setup – this is critical as it changes both the screen layout and the process. Warehouse Setup type is only used for the initial combined stock allocation to bins and transfer. It assumes that all stock is currently not allocated to bins, and is therefore treated as though it is sitting on the floor. Notice also that the From Location and To Location are the same, as this is an internal transfer moving stock from the floor to specified bins.
▪The process is to allocate the stock codes to bins (in the example above, Primary 1, Primary 2 and Bulk) and make the initial transfer of current stock on hand to these bins in one process.
|
How this will be accomplished requires some thought. In the example above, lines 1, 2 and 3 represent the same stock code (CARTON) with current stock on hand of 24 being distributed to 3 bins, ie. progressively working through a particular selection of stock and allocating the total stock on hand to all bin types. Depending on operational requirements, it may be more beneficial to work through a single bin type at a time. There is no right or wrong way – what is important is that there is a clearly defined process that ensures nothing is omitted or duplicated. |
▪Save the stock transfer.
Unlike routine stock transfers, these warehouse setup transfers tend to be large and complex. It may be useful to print a copy of the stock transfer and carefully check the details of bin allocation and quantity being transferred to each before proceeding to pick the stock.
At an existing site that already uses bins, where warehousing is being initiated for the first time, the above process will be a little different in that physical stock will not be picked from the floor and packed in bins. Instead, it is more probable that the stock will be transferred from one bin to another bin.
3.Pack the stock.
The final stage is to tell Jim2 that the process has been completed and all stock is now in the correct bins.
Edit the stock transfer and change the status to Finish. This will change the Mode to Packed.
4.Check the results.
View the individual stock – this can be performed by right clicking on the stock code from within the transfer, or going to Stock > View/Edit Stock.

Further information