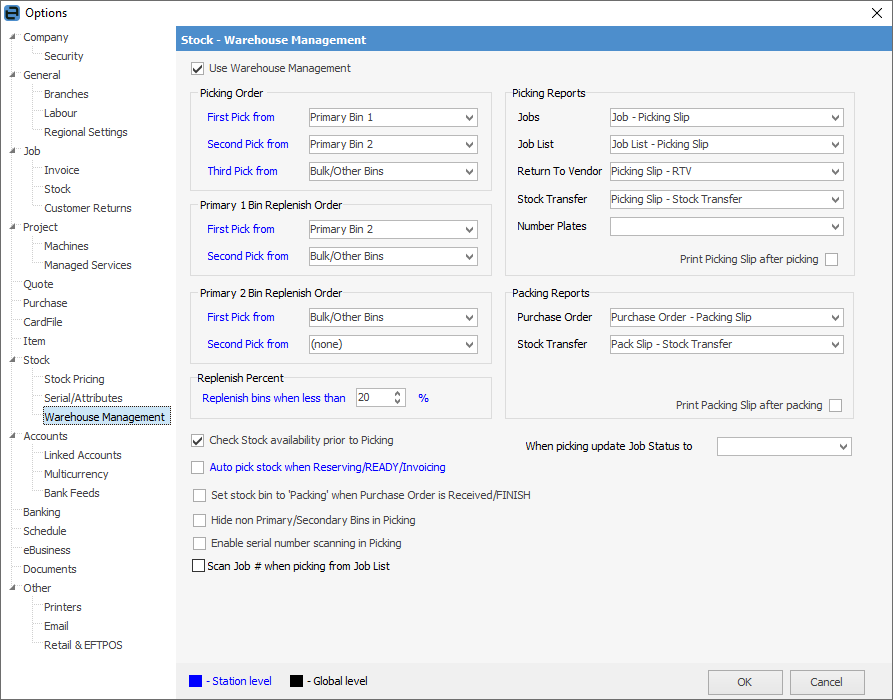
On the ribbon, go to Tools > Options > Stock > Warehouse Management and tick Use Warehouse Management. See below for more information on this screen.

Log off and back on to Jim2 for these to take effect.
|
Station Level Settings Text in Option groups coloured blue means that the settings apply only to the specific workstation from which they are set, whereas options in black are global settings, ie. all workstations. This provides considerable flexibility in that different functions within the business can define priorities for the picking of stock and replenishment of bins. This same functionality flows throughout Jim2. |
Field |
Explanation |
|---|---|
Use Warehouse Management |
After installing the licence key file, tick this box to use the warehouse management options in Jim2, then log off and log on to activate it. |
Picking Order |
Jim2 allows automatic picking of stock from two defined bins, as well as from a bulk area. These three selections determine that picking order. Jim2 defines two primary bins. Depending on the type of business, these could be, for example, the shop and a quick-pick holding area located in the dispatch area adjacent to the outwards packing table. Other businesses that typically sell bulk stock may change the order.

First Pick from Defines the primary location from which parts will be picked to fulfil orders, workshop use, etc. If this location is empty, Jim2 will pick the parts from the Second Pick from location, and so on. |
Primary 1 Bin Replenish Order, Primary 2 Bin Replenish Order |
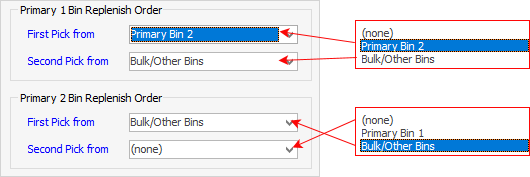
Part of the automated warehousing process is the replenishment of the primary picking bins. The selection here determines where stock will come from, and in what order when replenishing primary bins.

Example: Primary 1 Bin Replenish Order: ▪First pick from Primary Bin 2 ▪Second pick from Bulk/Other Bins |
Replenish Percent |
This determines the percentage of holding left in bins that will trigger a replenishment process. |
Check Stock availability prior to Picking |
If ticked, stock availability will be checked before the picking process. |
Auto pick stock when Reserving/Ready/Invoicing |
If ticked, once any of these statuses is selected, Jim2 will auto pick the stock. |
Picking Reports |
Select the default reports for each of the listed processes: jobs, job reports, return to vendor, stock transfer.
Jobs, Job List Defines the report to use, ie. Picking Slip.
Return to Vendor Defines the report to use, ie. Picking Slip – RTV.
Stock Transfer Defines the report to use, ie. Picking Slip – Stock Transfer.
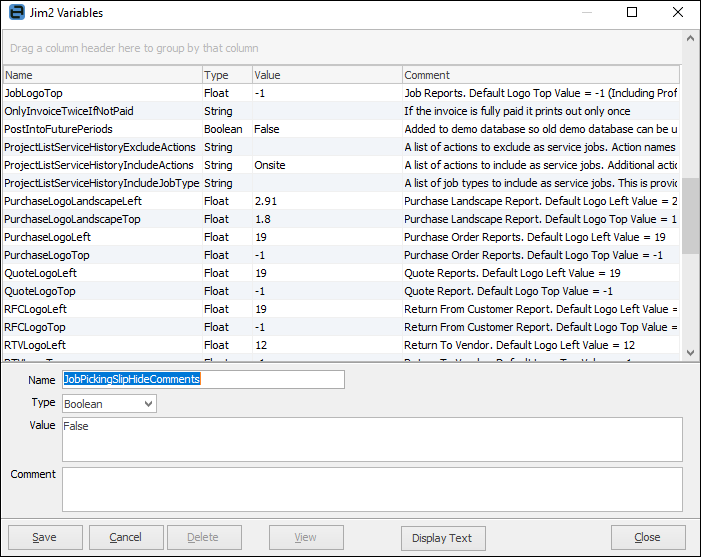
Comments can be hidden on the Job – Picking Slip Report by entering the following Global Variable:
 |
Print Picking Slip after picking |
Tick to print a picking slip automatically after picking the stock. |
Packing Reports |
Select the default reports for each of the processes listed.
Purchase Order Defines the report to use, ie. Purchase Order – Packing Slip.
Stock transfer Defines the report to use, ie. Pack Slip – Stock Transfer. |
Print Packing Slip after packing |
Tick to print a packing slip automatically once stock is packed. |
Check stock availability prior to Picking |
Tick to check stock availability prior to picking stock. |
Auto pick stock when Reserving/READY/Invoicing |
Tick to auto pick stock under these circumstances. |
Set stock bin to 'Packing' when Purchase Order is Received/FINISH |
Tick to automatically change to Packing on receive/finish of PO. If this is ticked and you receive stock, it will not be available to sell until you pack it first. Bin will show as unpacked. |
Hide non Primary/Secondary Bins in Picking |
Tick to hide non primary/secondary bins in Picking. |
Tick to allow serial number scanning after bin is scanned. Alternatively, user can scan bin, then stock, then serial after. |
|
Scan Job # when picking from Job List
This option works if scanning from a job list, ie. multi-job scanning. Scanning sequence is Bin > Stock > Job #. If this option is not enabled, after scanning bin and stock, quantity picked will be increased for matching bin and stock. If this option is enabled, quantity will be increased for scanned job, bin and stock, respectively. |
Scan Job# – Allows to scan the job number after stock. |
Clear Stock for each Job – After scanning the job, the user needs to scan the stock code again. |
|
Choose which Status the job should be changed to when picking. Jim2 will automatically change the status. |
Set up Stock Locations
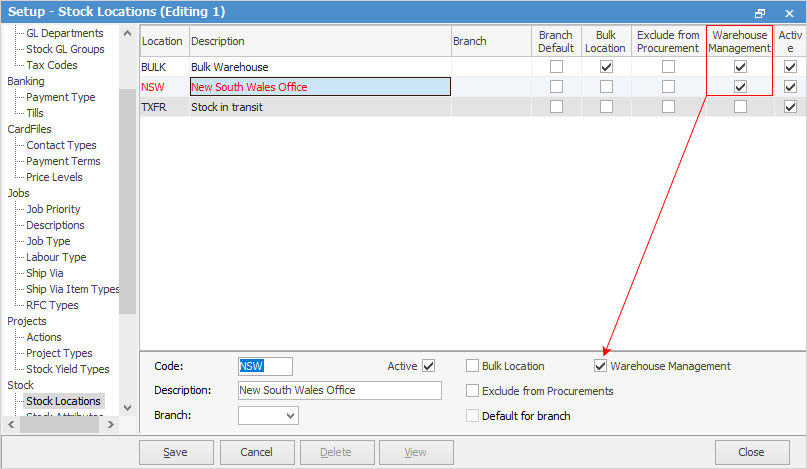
On the ribbon, go to Tools > Setups > Stock > Stock Locations.
|
Bulk location is used when there are multiple locations, so users can nominate the Bulk location to use in stock transfers or stock procurement. For example, all locations may not directly purchase from the supplier, but get their stock from the Bulk location. Used where operations have various interstate locations, but one main purchasing warehouse, for example. |
After turning on Warehouse Management, an additional column is activated in the Setups > Stock Locations screen > Warehouse Management.

Field |
Explanation |
|---|---|
Location |
Location name. |
Description |
Description of the location. |
Branch |
Branch, if Branches are used. |
Branch Default |
Stock locations can be linked to branches (if using branches) to ensure stock is purchased and sold to and from the correct locations. |
Bulk Location |
Bulk Location is used stock procurement is utilised to supply stock to a particular stock location from another stock location. For example, there are 5 warehouses, however, only one of these warehouses supplies the other warehouses with stock. The other warehouses never supply each other under the stock procurement procedures. |
Exclude from Procurement |
Exclude from Procurement is used to never use stock procurement to supply to this stock location. This is good for stock locations that deal with damaged stock or sample stock only. |
Warehouse Management |
Tick for each location that is to use stock picking. |
Active |
Tick to make this location active. |
Further information
