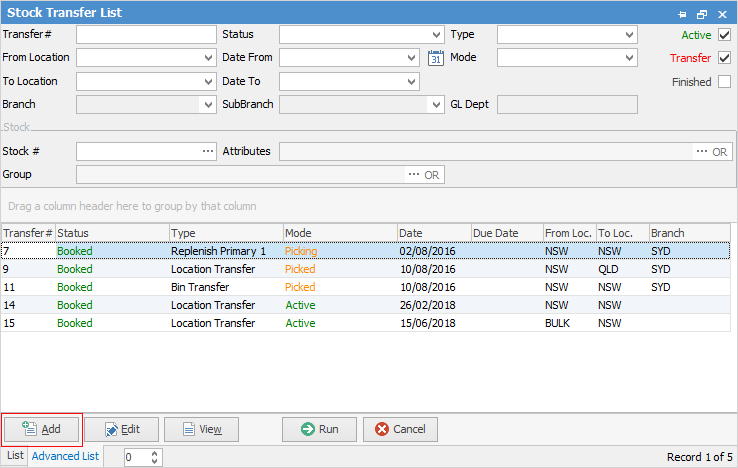
To create a new stock transfer, first create a Stock Transfer list in either one of these ways:

▪On the ribbon, go to Stock > Transfer Stock.
▪In the Nav Tree, right click on Stock and select Transfer Stock.

Sorting, searching and grouping are available as per other lists in Jim2. Select the column header in the grid, then drag it to the Group By area to group.

There are a number of fields within this screen which are detailed below.
List header fields
Field |
Explanation |
|---|---|
Transfer# |
Stock transfer number. |
Status |
The status of the stock transfer. |
Type |
Select the transfer type.
 |
From Location |
The location to transfer stock from. |
Date From |
Use this to select the dates to locate a stock transfer from. |
To Location |
The location to transfer stock to. |
Date To |
Use this to select the date up to which to locate a stock transfer for. |
Branch/Sub Branch/GL Dept |
Populating these fields will return a list for all transfers from these areas. |
Stock # |
Use this to select the Stock Code. |
Attributes |
Use this to further filter the list to only include stock, and also with a particular attribute. |
Group |
Select Group or Non Report Group as required. |
Stock transfer grid

Field |
Explanation |
|---|---|
Transfer # |
Stock transfer number. |
Status |
The status of the transfer. |
Type |
By location, bin or initial set up. |
Date |
Date the Transfer was entered or finished. |
Due Date |
Date the transfer is due. |
From Location |
The location the stock was transferred from. |
To Location |
The location the stock was transferred to. |
Buttons
There are five buttons at the bottom of the Stock Transfer list:
Add |
Adds a new stock transfer. |
Edit |
Opens the selected transfer in Edit mode. |
View |
Opens the selected transfer in View mode. |
Run |
Run the list using any filters selected in the header. |
Cancel |
Closes the Stock Transfer list. |
From the Report menu on the ribbon, produce a Stock Transfer list report for printing and reviewing.

Further information
How to