

The Job list is a very powerful function within Jim2. Lists are also one of the easiest features to master, and the most practical way of searching for information in Jim2. Users can define their own job responsibilities by creating lists that apply to their job function (for example, you can generate a list of all active jobs in your name, or use a status to find which jobs require action). Using job statuses, you can monitor how successful your procedures are, or users perform.
Job lists can run live in the Nav Tree, and will be refreshed at regular intervals (depending on how many minutes you stipulate) as jobs are updated across the network. You can even name your lists so that they represent what you are searching for. This helps the user if they have multiple lists running at the same time. You can also run a list of jobs by customer.
 |
The job list can collate information from your jobs, stock, card files, dates and status records in real time for cross reference, and also use archived data. Jim2 provides for searches on active and closed jobs by ticking the Active and/or Finish tick boxes. You can then monitor current and historic trends in relation to customers, users, stock and status. When using the job list, Jim2 gives you the unique function of being able to enter data into the fields to either search for or exclude data.
Using Groups can further refine searches. Double clicking on the word Group at the beginning of the Group field within the list header field will turn green to indicate that group selection is inverted. For example, select stock that is not in these groups.
|
Configuring a job list can be done from either a standard List or using the Advance List selection. List or Advanced List can be selected at the bottom left of the Job List screen.

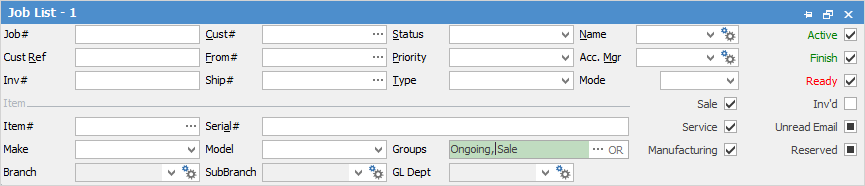
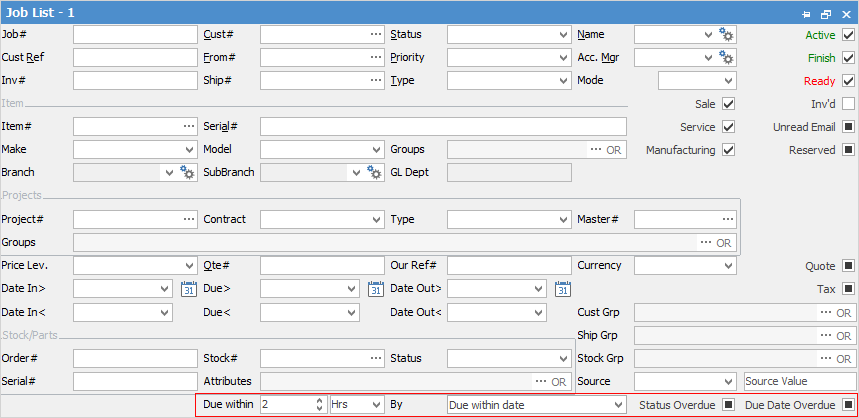
Standard Job List header
 |
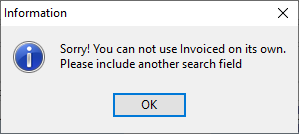
Once a job has been invoiced, it will not appear in the job list unless you tick Inv'd (top right of header) and enter a Cust# or Name.
Note: Active, Finished, Ready must be unticked, otherwise you will receive the following warning:
 |
|
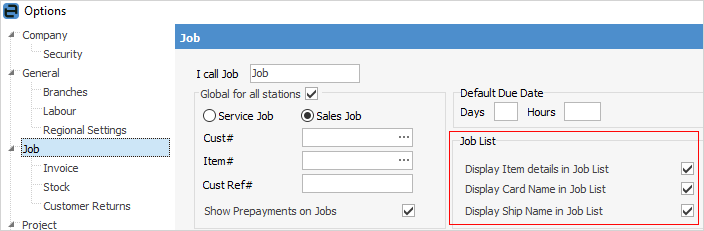
If you can't see customer, ship or Item details in the list, go to Tools > Options > Jobs and tick these settings under Job List.
 |
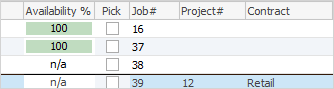
Tick Auto Pick Stock at the bottom, which will display the Availability % column within the list, showing what stock is or isn't available – a great time saver, as you don't need to go into the stock record to find out!
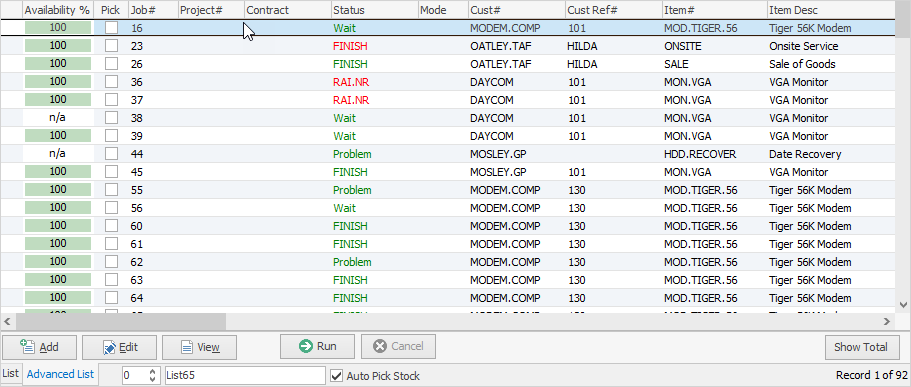
You will note that the word Finish in a job list can be one of three colours:
▪Green means the job is finished but still active.
▪Red means the job is finished and has been set to Ready to invoice.
▪Black means the job is finished and has been invoiced.
The job List tab is the default. In this screen you can select the following fields and combinations of fields to generate a job list.
Field |
Explanation/Usage |
|---|---|
Job# |
Shows a list of jobs with the particular job number entered here, ie. the one job number will appear in the list. |
Cust Ref# |
Shows all jobs with the particular customer order or reference number entered here. |
Inv# |
Shows jobs with the invoice number entered here. |
Cust# |
Shows all jobs being invoiced to a customer entered here. If this field is coloured light red, this means the customer is on credit hold. |
From# |
Shows all jobs from the particular customer entered here. |
Ship# |
Shows all jobs being shipped to the particular customer entered here. |
Status |
Shows all jobs with the job status entered here. |
Priority |
Shows all jobs with the job priority entered here. |
Type |
Shows all jobs with the job type entered here. |
Name |
You can select a user's name or logged user (yourself). |
Acc Mgr |
Shows all jobs with the account manager code entered here. |
Active |
Tick to show all active jobs. |
Finish |
Tick to show all finished jobs. |
Ready |
Tick to show all jobs ready to invoice. |
Inv'd |
Tick to show all jobs that have been invoiced. You must untick Active, Finish and Ready and also select either a Cust# or Name, otherwise you will receive a warning:
|
Unread Email |
Tick to show all jobs with unread emails (they will show in bold text). |
Reserved |
Tick to show all jobs with reserved stock. |
Tick boxes: |
|
|
|
|
|
Item# |
Shows all jobs with the Item code entered here. |
Ser# |
Shows all jobs with the Item serial number entered here. |
Make |
Shows all jobs with the Item make entered here. |
Model |
Shows all jobs with the Item model entered here. |
Groups |
Shows all jobs in the Item group/s selected here. |
Job Type |
Shows all jobs of the type entered here from Sale, Service, Manufacturing. Leave blank and all types will show in the list. |
Branch/SubBranch/GL Depts |
If used. |
 Will only return results for what is ticked.
 Will not return results for any unticked boxes.
 Will return results for all of the above.
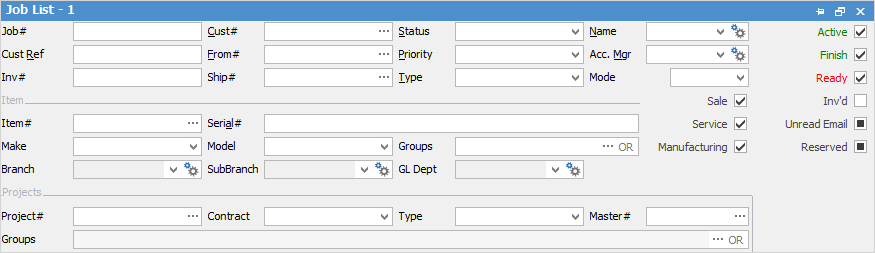
Advanced List
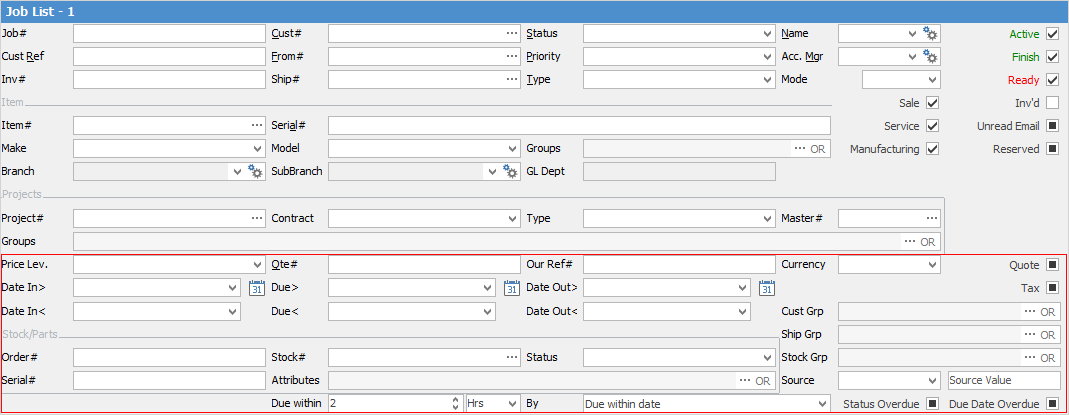
Highlighted area is Advanced Job List
The Advanced List will allow you to search by the following criteria, in combination with any of the fields above:
Field |
Explanation |
|---|---|
Price Level |
Select price level, eg. Retail, Wholesale, etc. |
Qte# |
Enter a quote number here to bring back a list of all jobs related to that quote number. |
Our Ref# |
Enter a reference number here to bring back a list of all jobs with that number. |
Currency |
Only used if licensed for Multicurrency. |
Date In> |
Search for jobs that were added on or after the date added here. |
Date In< |
Search for jobs that were added on or before the date added here. |
Date Due> |
Search for jobs due on or after the date added here. |
Date Due< |
Search for jobs due on or before the date added here. |
Date Out> |
Search for jobs that were invoiced on or after the date added here. |
Date Out< |
Search for jobs that were invoiced on or before the date added here. |
Stock/Parts |
|
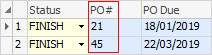
Order# |
Show all jobs based on the order number entered here. This number relates to the line level PO# in the stock grid of the job:
|
Stock# |
Show all jobs using the stock code entered here. This relates to the stock code in the stock grid of the job.
|
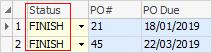
Status |
Show all jobs using the status entered here. This relates to the line level status in the stock grid of a job.
|
Serial# |
Show all jobs using serial number entered here – you can enter part of a serial number and it will bring up any that match. This relates to serial numbers selected within the Description area of the stock grid on the job. |
Attributes |
Show all jobs using attributes entered here. This relates to attributes selected within the Description area of the stock grid on the job. |
Cust Groups |
Show all jobs within the customer group/s. |
Ship Grp |
Show all jobs within the ship group/s. |
Stock Grp |
Show all jobs within the stock group/s. |
Source/Source Value |
These fields will run the lists and any filters you have selected, ie. Scheduler, Website, Email, Mobile, B2Bin. These are used for eBusiness purposes and using Website as source value – only usable if you are licensed to use eBusiness.. |
Due within |
Shows all jobs due within these days and hours. |
Due within date |
Choose from Status Due or Date Due to refine your list. |
Status Overdue/Date Overdue |
Tick to show, untick to hide, solid black box to show all. See below for more information. |

|
On the right-hand side of the Groups selection within the list you will notice ... OR. If you click this it will change to &. This relates to how you want to use groups within your search. If you want to select two groups and find things that are in both groups, use the & option. If you want to search two groups and find anything that is in either one of those groups use the OR option. Double clicking on the word Groups at the beginning of the Groups field will turn the field green to indicate that group selection is inverted. For example, select jobs that are not in these groups. |
Your search results produce a list in a format that can be grouped even further. Dragging a given column header to the grey area at the top of the list results table will allow you to sort your results by that column header. This is normally known as grouping. The grouping area is clearly identified.

To view or edit any of the jobs within the list, simply double click (or use your F2 function key) on any of the fields relating to the job you wish to display.
Date and Status Due Overdue Filters
Using the overdue job filters, you can create lists to watch for any job that is overdue based on the due date and status due dates.

Not all fields are showing in this image
This section explains the field headings in the job list. Refer to Lists for details on sorting, naming, grouping, etc. The headings may not be strictly in this order, and there may be extra columns depending on your version of Jim2.
Field |
Explanation |
Pick |
Tick the required boxes to display these stock codes in the Picking List report. If nothing is ticked, the Picking List report will be empty. |
Job# |
Job number. |
Status |
Job status. |
Cust# |
Customer card code. |
Cust Ref# |
Customer reference. |
Item# |
Item code. |
Item Desc |
Item description as specified in the Item code. |
Serial# |
Serial number, if applicable. |
Date Due |
Date estimated that job should be finished. |
Time Due |
Time estimated that job should be finished. |
Name |
User's name/initials. |
Acc. Mgr |
Customer's account manager. |
Total Inc. |
Invoice total including GST. |
Total Ex. |
Invoice total excluding GST. |
Job Type |
Type of job, ie. sales or service. |
Type |
Job Type as set up in Tools > Setups > Jobs > Job Type. |
Inv# |
Job mode, ie. active, reserved, etc. |
Priority |
Job priority, ie normal, urgent. |
Quote# |
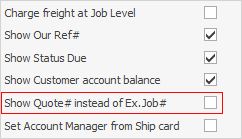
Quote number, if this job was converted from a quote. This field may show Ex Job# if Show Quote # instead of Ex.Job# is unticked in Job Options. Ex Job# will show a previous linked job.
 |
PriceLevel |
Price level, ie. retail, wholesale, etc. |
Tax Paid |
Indicates whether tax is included or not (T = included, F = excluded). |
TaxContent |
Shows the total amount of tax included on the job. |
Quote |
Indicates whether there is a quote or not (T or F). |
OurRef |
Shows our reference number. |
Status Date |
Displays the date the status is due to change as set up in Tools > Options > Job. |
Status Time |
Displays the time the status is due to change as set up in Tools > Options > Job. |
Date In |
Date the job was entered into the system. |
Time In |
Time the job was entered into the system. |
Date Out |
Date the job was finished. |
Labour |
Shows the labour time used on the job. |
Ex. Job#/Quote# |
Displays the original job/quote number based on your choices in Tools > Options > Job. |
From# |
Displays the customer who requested the job. |
Ship# |
Displays the shipping card code. |
Fault Description |
Shows the information entered into this field on the job form. |
Invoice Description |
Shows the information entered into this field on the job form. |
Branch |
Displays the branch, if applicable. |
Customer Region |
Displays the customer region group for the customer. |
Ship Region |
Displays the ship region group for the customer. |
 |
When viewing a job from a list, click the arrow in the quick access toolbar for the next/previous job in that list:
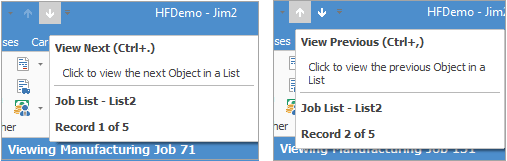
Shortcut keys:
Ctrl+. moves to the next object in the list Ctrl+, Moves to the previous object in the list |
Meaning of background colours:
Job# Yellow |
Stock is on back order. |
Status: Green |
Job is not set to Ready. |
Status: Red |
Job is set to Ready, but not invoiced. |
Black |
Job is finished and invoiced. |
Cust# Red |
Customer either on credit hold, or payment overdue. |
Full row Orange |
Job has been on the same status for too long. |
Right-Click Options in the Job List

Right Click Option |
Function |
||
|---|---|---|---|
View |
View the highlighted job. |
||
Edit |
Edit the highlighted job. |
||
Show Item details |
Shows Item# and description details in the job list grid. |
||
Auto Pick Stock |
Queries the list and indicates the availability of stock for each job in the list. This will show the Availability column. You can then tick the Pick tick boxes for those you wish to pick.
 |
||
Auto Create Purchase Orders |
Allows for the auto-creation of purchase orders for the list of jobs.
 |
||
Change Jobs Status |
This will change the status of all jobs in the list as outlined in this image.
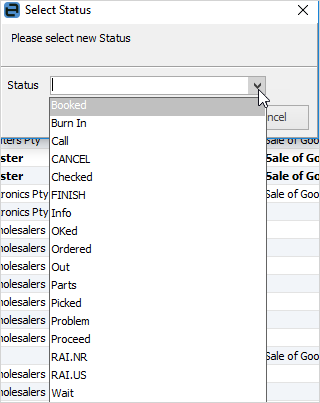
Note that the job list must have jobs of the same type, ie. Sales only. |
||
Change Jobs Due Date |
This will change all the jobs in the list's due dates.
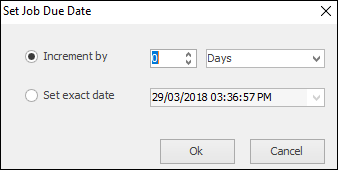
This can only be done on Active jobs. |
||
Export Data |
Exports data from the grid to a spreadsheet. |
||
Export Grid |
Exports the grid to a spreadsheet. This is particularly useful if your grid has more than one header row, as it will export all header rows. |
||
Print the list. |
|||
Print Preview |
Preview the list to be printed. |
||
Copy Cell |
Copy the cell you have clicked on. |
||
Copy Row |
Copy the entire row you have clicked on. |
||
Copy All |
Copy all, which can then be pasted into a spreadsheet |
||
Show Find panel |
Opens the Find panel:

|
||
Grid Columns... |
Allows you to select more columns to add to the grid. |
|
The list of jobs needs to be the same job type, ie. sales, service or manufacturing. Jobs that are on a status of Finish, RAI.US or RAI.NR will not be updated. |
Right Click Options in the Nav Tree
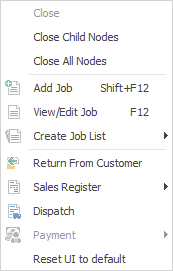
After the top 3 (which are self explanatory), these options mirror what is in the ribbon in the Jobs tab, except for the last tab, which will reset all tabs to default.
Further information: