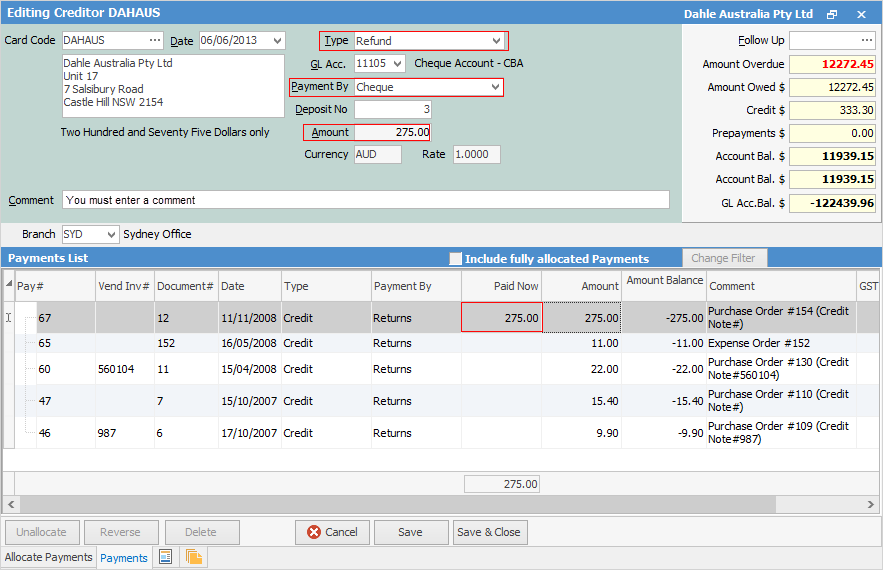
Refunds can be given on either a return to vendor entry or on any credit amount within the vendor's creditor balance.
1.To create a refund you must be in Edit Mode.
2.Enter the date of the refund or use the default date (the day of entry).
3.Now select Refund as the Type of transaction. This will automatically take you to the Payments screen.

 |
You will see some letters underlined in the field names within the header, eg. Type. Using Alt+ the underlined letter will jump you to the field beside that heading. |
4.Select the GL bank account you are writing this refund from. This will default to the GL bank account set up in Banking Options. If you want to use your Unbanked Funds account,  see below.
5.Select the appropriate Payment By for this refund. You must specify the method of refund: cash, cheque, credit card, etc.
6.Within this screen you need to locate the return/credit. To refund a credit, it needs to have an amount in the Amount Balance field.
7.Enter the amount of the refund into the Paid Now field. When you move from the Paid Now field, the Amount field in the form header will be automatically populated with the correct amount.
8.You must enter a comment into the Comment field in the header of the form.
9.Click Save to complete the refund entry.
 |
You will not be able to save the transaction if you haven't entered a comment in Step 8. |
 |
If you have enabled Allow Negatives (in Tools > Setups > Payment Type), you can select the Unbanked Funds GL account once you have selected the Payment By method. If you are refunding by cash or EFTPOS, this means your unbanked funds will show the refunds, and your banking in Jim2 will match your bank statement. |
Further information: