On the ribbon, go to Stock > Promotional Pricing.

The Promotional Pricing list is used to add new and edit/view existing promos.
By default, the Promotional Pricing list displays only promotions that are current, as the Promo > criteria is set to today's date.

The list is also useful for finding what stock is currently on promotions and what promotions are available to customers, what are coming up, and which vendors currently have promotions on offer. For example, by entering a stock code and clicking Run, all promotions related to that stock will be displayed. By changing the date filters, easily see when that stock was last on promotion, etc.

|
Some letters in the field names within the header are underlined, eg. Vend#. Using Alt+ the underlined letter will jump to the field beside that heading. |
The Promotional Pricing list header fields are explained below:
List Fields |
Explanation |
|---|---|
Promotion# |
Enter a Promotion# here and the list will return that promotion only. Leave blank to list all promotions. |
Type |
Choose the promotion type to return a list of only that type. |
Promo > |
Choose a date after which the promotion commenced. |
Active |
Tick to show active promotions. Unticked will show both active and inactive promotions. |
Description |
Enter text here relating to the descriptions used in promotions to refine the search. For example, End of Season Sale, etc. |
Promo < |
Choose a date prior to the promotion commencement. |
Our Ref |
Enter a reference number to refine the list. |
Notes |
Enter text here relating to the Notes used in promotions to refine the search. |
Cust# |
Enter a customer card code to produce a list of all promotions for that customer. |
Currency |
Enter the currency. |
Stock Code |
Enter a stock code, which will produce a list of all promotions using that stock code. |
Vend# |
Enter a vendor card code to produce a list of all promotions for that vendor. |
Stock Group |
Select a stock group or groups to refine the list. |
Branch |
Select a Branch, if branches are enabled. |
|
On the right-hand side of the Stock Group selection within the list is the word OR. Clicking this wording will change it to &. This relates to how to use groups within the search. To be able to select two groups and find things that are in both groups, use the & option. To search two groups and find anything that is in either one of those groups, use the OR option. Double clicking on the words Card Grp at the beginning of the Card Grp field will turn the field green to indicate that group selection is inverted. For example, select cards that are not in these groups. |
Using the above information, Jim2 produces a list in a format that can be sorted by dragging the column header to the top of the list results table. To view or edit any of the promotions within the list, double click or use the F2 function key on any of the fields relating to the promotion to be displayed.

There are also additional buttons at the bottom of this form, as explained below:
Button |
Purpose |
|---|---|
|
This will add a new promo. |
|
This will open a selected promo in edit mode. |
|
This will open a selected promo in view mode. |
|
This will run the query and display the list using the filters selected. |
|
This will close the list. |
|
To run a quick search through the list, start typing text in the field to be searched on. Using intuitive type, Jim2 will locate the first occurrence of the value being entered if it exists in the list. |
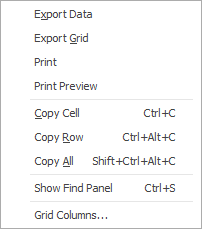
Right click options in the promotional pricing list

Right Click Option |
Function |
||
|---|---|---|---|
Export Data |
Exports data from the grid to a spreadsheet. |
||
Export Grid |
Exports the grid to a spreadsheet. This is particularly useful if the grid has more than one header row, as it will export all header rows. |
||
Print the list. |
|||
Print Preview |
Preview the list to be printed. |
||
Copy Cell |
Copy the highlighted cell. |
||
Copy Row |
Copy the highlighted row. |
||
Copy All |
Copy all, which can then be pasted into a spreadsheet |
||
Show Find panel |
Opens the Find panel:

|
||
Grid Columns... |
Allows adding more columns. Also allows removal of columns. Select the column to add, then drag it to the position required in the columns within the grid. To remove, click and drag to the Grid Columns... window, or drag down away from the header area. |
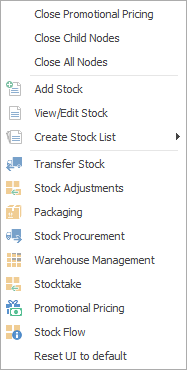
Right click options in the Nav Tree

After the top 3 (which are self explanatory), these options mirror what is on the ribbon in the Stock tab, except for the last tab, which will reset all tabs to the default.
Further information
Promotional Pricing Order of Processing
Example Usage of Promotional Pricing


