
The stock grid is designed to record and calculate the selling price of all the labour, depleting, non depleting, special and applied (tests and checks) stock for each job relative to the customer's price level for stock used.
Once all the codes are entered, they can be supplied, back ordered, priced and invoiced.
1.Open the required job in Edit mode.

2.Click in the Stock Code field, or press F4. To add a new line, press either the down arrow or the Insert key on the keyboard.
3.Enter the applicable stock code.
|
You will see some letters underlined in the field names within the header, eg. Cust#. Using Alt+ the underlined letter will jump you to the field beside that heading. |

4.Press Enter to move along the stock grid to the Order field.
5.Enter the quantity of the stock code required for the job. If the stock code is available, Jim2 will then display the same quantity in the Supply field.
|
If the supply quantity is coloured red, this indicates that there is an action to be taken. |
6.Press Enter to continue moving along the stock grid.
7.Edit pricing as required.
8.Press the Enter key to continue moving, eventually to a new line where you can add further required stock codes, quantities and pricing.
9.Click Save or Press F9.
 |
Note: the price level on the customer record must match a price level on the stock record. Whilst a stock record may have more than one price level, it will pick the one that matches the card file price level. |
Remembering that Jim2 is a live multi-user environment, it should be made clear that calculations of available quantities of stock are affected by what is/has been received via purchases, and what has actually been sold (invoiced or specifically held for a job).
|
Certain Items can have stock (such as tests and checks) apply to them. The Applied Stock will automatically appear in the grid – you don't need to add it. |
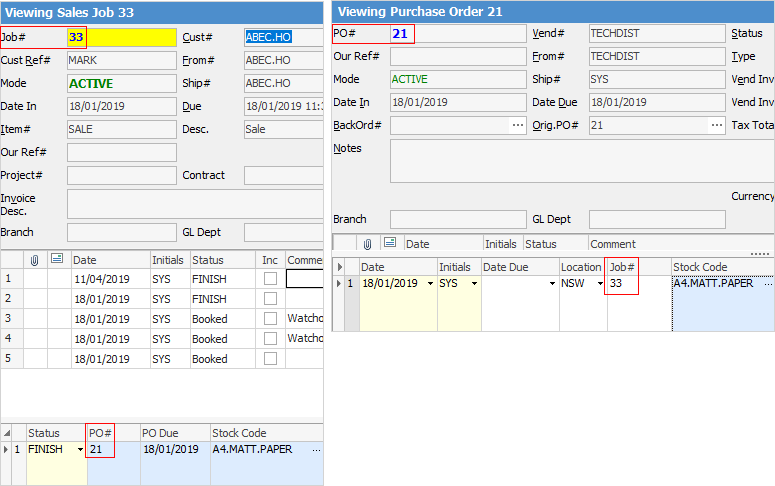
If you have purchased stock specifically for a job (the purchase order will show a Job#), that stock and a link to the purchase will automatically appear in the stock grid of the job.
|
You can also copy/move/merge stock from other jobs, quotes or project templates. |
Select the stock grid by either:
▪Pressing the F4 function key, or
▪Click in the Stock Code field.
|
If adding multiple stock lines to the grid, there are two ways to accomplish this: 1.Tab to the end of the line, then the Enter key will take you to the next line in the grid, ready to insert another stock code. 2.From within any field, press the down arrow on your keyboard to add a new line.
If you wish to add a stock line above another stock line, select the line then use the Insert key on your keyboard – this will insert a new line directly above the line you selected. |
To add stock to a job move to the Stock Code field of the stock grid and select stock in one of the following ways:
▪Click on the ellipsis [...](or use F5), which brings up the Stock Select screen. The Stock Select screen helps you to locate and select stock, and verify the quantity of each stock is in each stock location.
▪Start to type the stock code. Jim2's intuitive type will begin to pre-empt your choice of stock codes from its database as you type each letter.
▪Scan the stock barcode to automatically add the correct stock code.
|
If you have purchased special stock for a job you can add it to a job by either: ▪typing the stock code and selecting the ellipsis [...] in the Description field. Select which special stock to add to this job, or ▪adding the job number to the purchase order (this will automatically add the stock to the job). |
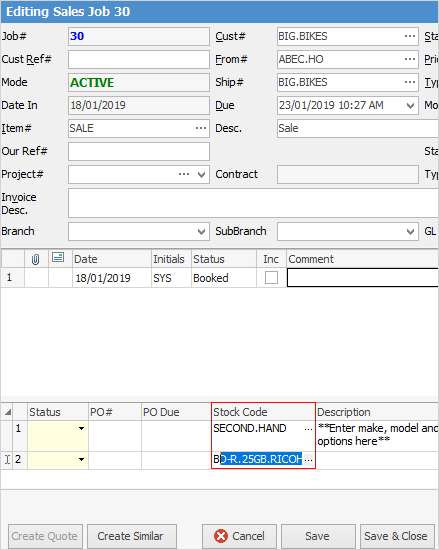
When you enter the stock code the stock line will show with the stock code in red, indicating that this is special stock.

When you purchase stock specifically for a job, the stock line will show the PO and the job in a light blue colour.

Once you have selected the stock, the stock description will be defaulted to the Description field automatically.
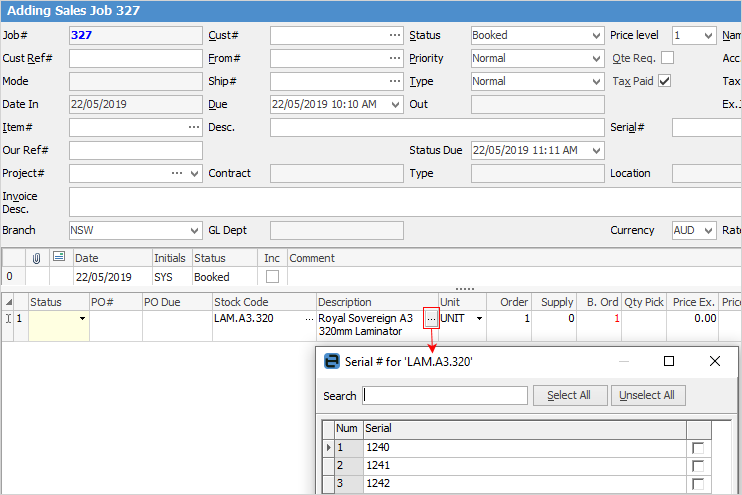
If adding serialised stock, enter the serial numbers for the stock (if required) by selecting the ellipsis [...] within the Description field.
|
You can expand or reduce the number of fields viewed in the stock grid by selecting the
 |
 on the top left-hand corner of the stock grid. This feature allows you to view all defaults for that stock, including the stock location defaulted to the user. By expanding the grid to show all fields, you can override these defaults if required.
A default unit measure of the stock will be added to the Unit field. To select a different unit measure available for that stock, click the drop-down list ( ) and re-select.

Enter the quantity required for the job. The prices will default to those set up for that Price Level for that customer (provided the stock has been set up with prices and price levels – you can edit the prices at this point.
|
If the stock you are adding to this job is set up as either Serial on PO or Serial on Sell you will need to enter serial numbers once you have entered the quantities. You will not be able to Invoice this job without the correct serial numbers having been entered or selected.
|
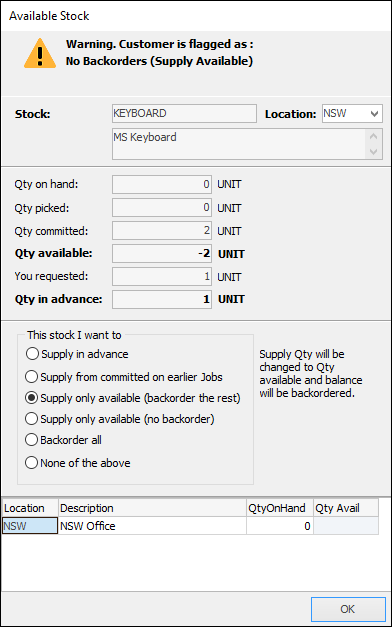
If the quantity entered is more than is available for sale on this job the Selling Stock in Advance screen will be displayed. This screen will have six options to choose from, and will default to your selection in Tools > Options > Job > Stock.
|
The warning at the top of the screen above relates to what has been nominated on the customer's back order setting on their card file. |
Options |
Explanation |
Supply in advance |
No changes will be made to the quantities entered.
Note: You can set security to stop users from being able to supply in advance via Tools > Security > Jobs > Stock on Jobs, and untick Sell stock in advance. |
Supply from committed on earlier Jobs |
Will allow you to take stock from other jobs, if your security allows this. |
Supply only available (back order the rest) |
The Supply Qty will be changed to the quantity available in stock and back order the rest. |
Supply only available (no back order) |
The Qty Ordered and Supplied fields will both be changed to the quantity available in stock. |
Back order all |
Back order all if the customer wants the entire order supplied together. |
None of the above |
Will force you to make a decision on a job by job basis. |
|
There are a number of functions available if you right click within the stock grid – for more information see the Job stock grid section. |
You are also able to see the history relating to stock, showing what stock has been sold to a given client in the last 365 days.

|
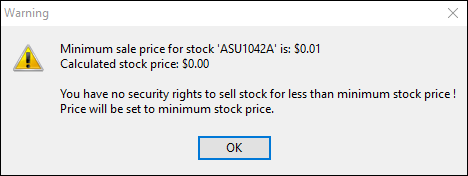
You can set security on adding stock, ie. you don't want a user to be able to sell stock for less than a minimum price. This will produce a warning to the user:
 |
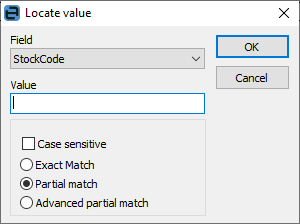
Within the stock grid, you can search all columns and rows by selecting Ctrl+S. This will bring up the Locate value screen, where you can select which field to search, enter the text to search for in the Value field.
Further information: