
The following procedure assumes you have basic knowledge of the Windows operating system, Jim2 Client and the Jim2 Server Console.
Please be sure to take note of the Install Checklist first.
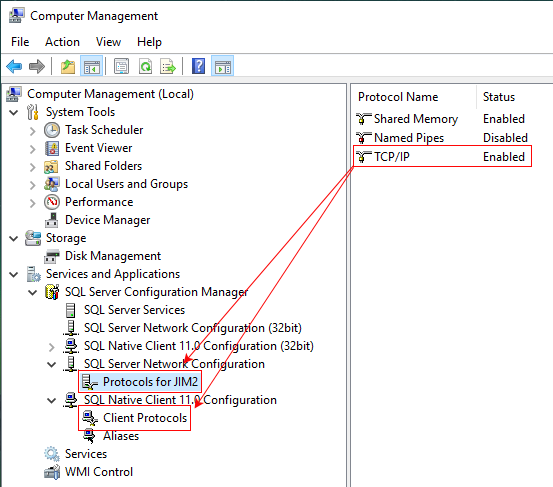
▪After SQL install, ensure SQL Protocols are enabled for the new instance via Configuration Manager (full SQL install only).
▪Update SQL Authentication to mixed, and update password policy if applicable (full SQL install only).
▪Enable sa user and update password (full SQL install only).
▪Install Jim2 and upgrade to latest version if required.
▪Update/create firewall rules on the new server (see below).
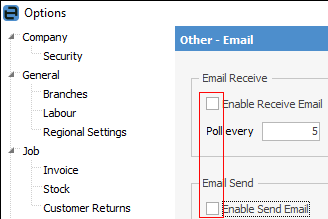
▪Turn off email functions in Jim2, and ensure no more emails are going in and out.
▪Backup and restore primary databases.
▪Disable Jim2 and Jes service on existing server.
▪Create Jim2 Share for folder location %\Program Files(x86)\Happen\Jim2 (read for everyone on the Jim2 folder).
▪Update Jim.ini in the Jim2 folder, and set to your database by default.
▪Configure Jes from backup XML, as per previous section. That is, assuming you installed Jim2 on C:\, the Jes file you need to back up and restore on the new server is located here: C:\Program Files|Happen Business|Jes\bin\Jes_Config_Jim_XXXX. Stop Jes on the new server, replace the file, then start Jes.
▪Jim2 Mobile transfer request to Happen, if applicable.
▪New licence key installed.
▪Test with Jim2 Client on workstation and server.
▪Ensure backup configured on new server.
▪Enable email in Jim2 on new server.
Summary
Install Jim2 on the new server from the latest installer: http://installer.happen.biz/Installs/Jim2Setup/Jim2Setup.exe (copy and paste into a web browser).
|
The version of SQL must be the same or newer than that on the old server, ie. if you have SQL 2014 on the old server you can install SQL 2014 or a later version. |

▪The latest installer will download SQL 2016 Express by default, if selected to do so.
▪You can download SQL Express 2016 from https://www.microsoft.com/en-au/sql-server/sql-server-editions-express (copy and paste into a web browser).
|
If you install SQL manually (not via the Jim2 Installer), you will need to ensure TCPIP is enabled via the SQL Server Configuration Manager:
If you install SQL Express 2016 manually, we recommend naming the instance JIM2. |
▪Download and install MS Management Studio (optional, but advised):
–From https://docs.microsoft.com/en-us/sql/ssms/download-sql-server-management-studio-ssms (copy and paste into a web browser).
–Select Download. Scroll to the lower portion of the file selection options.
–Download and install MgmtStudio 64BIT\SQLManagementStudio_x64_ENU.exe
Before logging on to the database, download and install the Latest Jim2 Update from www.jim2.com.au/support/latest-update/ (copy and paste into a web browser).
|
If you are installing an earlier version of Jim2, you will need to upgrade that database first. |
▪Confirm Jim2 works, and that you can log on to the Demo database.
Register the new server with Happen, and install the licence key:
▪To register, log on to the Demo database with the username: sys and password: sys.
▪Choose Register, fill in the form and send to Happen.
▪The key from Happen will have instructions on how to install.
|
You cannot use the key from your old server on the new server. You require a new key to be supplied. |

Do a Jim2 Backup of the database from the Jim2 Server Console of the Old Jim2 Server (ensure you have stopped email delivery as per the checklist items above).
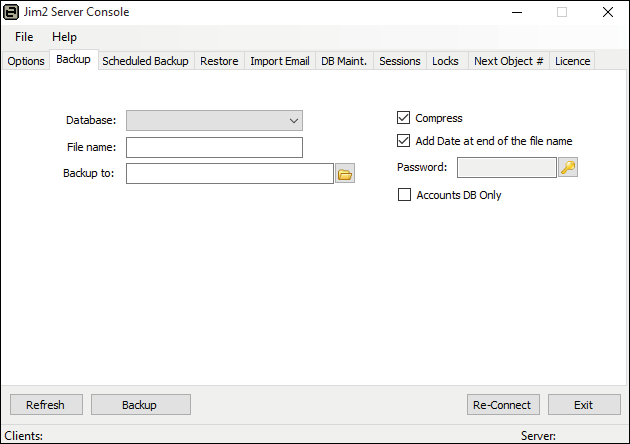
Restore the Backup on the new Jim2 Server.

Once you have Jim2 running, and have logged on to your Jim2 database, you can move the Jes configuration to the new server as well:
▪Copy the XML file for your Jes instance off the old server, usually found here: C:\Program Files\Happen Business\Jes\bin\jes_config_jim_yourcompanyname.xml
▪Paste it into the same directory on your new server.
▪Create a new Jes service using the Jim2 Configuration Manager (Jim2CM.exe).
▪The name should match your Jim2 database, and be the same in the Jes configuration file name: e.g. Jim_yourcompanyname.
▪When creating the Jes Instance, Jim2CM will ask if you wish to re-use the settings. If found, click Yes.
▪When you start, you may get some errors because you do not have the same directories set up on your new server. You can either fix them in the Jes configurator, or create them on the new server as required.
|
Jim2 Mobile If you have been using the Happen Cloud (Jim2 Mobile) on the old server, your configuration will move to the new server. You will need to tell us when you go live with the new server so we can change the cloud access from the old to new server. Until that time you will receive Cloud Server access errors. (We do not allow multiple Jim2 servers to connect at the same time.)
Jim2 eBusiness Website (Jef) If you have a Jim2 eBusiness website, you may need to contact us for further information. |
Notes
▪It is best to get your new server up and running with plenty of spare time before decommissioning the old server.
▪You can register your new server at any time.
▪You cannot start the Jes service until the Jim2 database is restored.
▪The Jes service name needs to match the Jim2 database name.
▪If you are unsure about any steps, please ask.
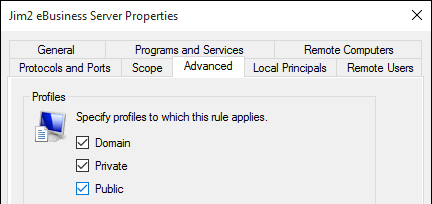
Setting up a Windows Firewall for Access to SQL Server and Jim2 Server
Allow access for the following applications (you should not open ports only). Configure the applicable rules as per below. One rule is required for each of these applications:
▪SQL Server: Sqlservr.exe (usually found in: C:\Program Files\Microsoft SQL Server\MSSQL<version>.<instance_name>\MSSQL\Bin\ )
▪SQL Browser: sqlbrowser.exe (usually found in: C:\Program Files(x86)\Microsoft SQL Server\<version>\Shared\ )
▪Jim2 Server Service: jim2server.exe (Usually found in: C:\Program Files\Happen Business\Jim2Server\ )
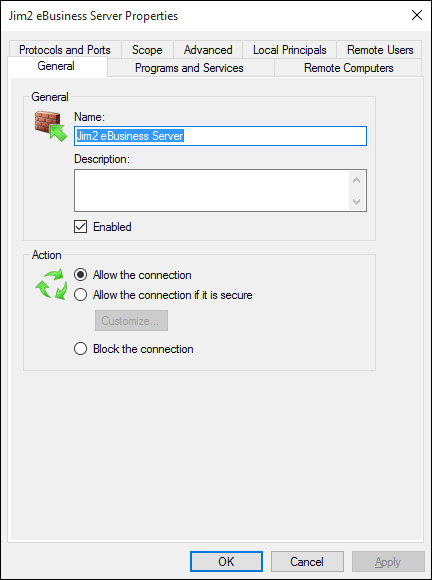
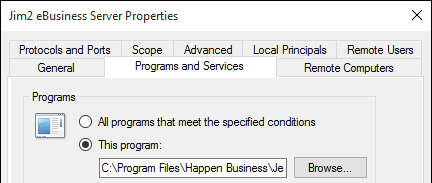
▪Jim2 eBusiness Server: jes.exe (Usually found in: C:\Program Files\Happen Business\Jes\Bin\ )
The rules only differ when it comes to the Name on the General tab, and Application selected on the Programs and Services tab.

Anti-Virus Exclusions
It is recommended that the primary Jim2 executables are excluded from real time scanning, both at the desktop and server level. Where possible, the Happen Business Program file folders should be completely excluded.
Server Folders (include sub folders)
C:\Program Files\Happen Business\
C:\Program Files(X86)\Happen Business\
Desktop Folders (include sub folders)
C:\Users\frank.lampard\AppData\Local\Happen Business\LocalJim2\
Terminal Server Folders (include sub folders)
C:\Program Files (x86)\Common Files\Happen Business\JimClient\
Server Files (trusted applications)
Jim2Server.exe
Jes.exe
JimReportServer.exe
Jim2.exe
Jim2Client.exe
Desktop Files (trusted applications)
Jim2.exe
Jim2Client.exe
Terminal Server Files (trusted applications)
Jim2.exe
Jim2Client.exe
|
We also recommend server exclusions for SQL Files as per Microsoft recommendations: https://support.microsoft.com/en-us/kb/309422 |
After Jim2 has been installed on the new server, the following steps are required to give users access to the Jim2 Client.
|
You do not need to install Jim2 on client computers. |
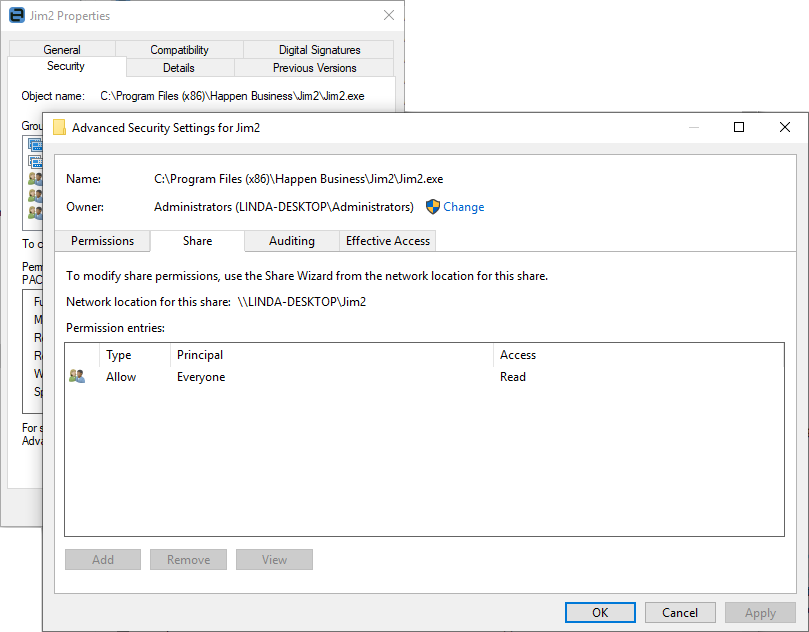
Share the Jim2 folder on the server, giving Everyone Read Access.
C:\Program Files (x86)\Happen Business\Jim2
Once the folder has been shared from the client side, create a shortcut to the Jim2.exe contained within the Jim2 folder, and place it on the user's desktop.
Further information:
Change the Name of Your Database