
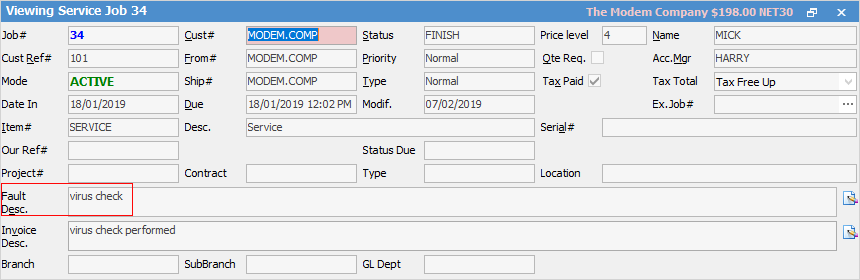
The Job header records information relating to the job number, customer information, status, Item and dates. When adding a job the default job can be a sale, service or manufacturing job in Tools > Options > Job. You can switch between the differing job forms by editing the Item field – select a sales, service or manufacturing Item and the job will update to the correct type.

 |
You will see some letters underlined in the field names within the header, eg. Cust#. Using Alt+ the underlined letter will jump you to the field beside that heading. |
 |
In a service job, the Fault Desc. field is used to make a record of the problem that needs to be resolved. This field will only appear in service jobs.
When entering information into the Job header, using the Enter or Tab key will allow you to follow a logical data entry path (ie. skips to the next required field). The logical path helps you to fill in all required fields. |
Below is a detailed explanation of the fields that appear in the Job header area:
Field |
Description |
Job# |
This is a unique number generated automatically by Jim2 to identify a specific job.
Note: When the background is coloured red, this indicates it is special stock. When the background is yellow, this indicates the stock is on back order. |
Cust# |
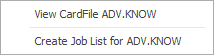
Enter the card code of the customer who will be invoiced for this job. The information (contact/name/address) in that customer's card file will appear on all invoices subsequently generated. The card file or debtor details for the shown card code can be accessed by selecting the hyperlink that appears when you move the cursor over the Cust# field name. You can also create a job list for that customer from here.
 |
Cust Ref# |
Use this field if the customer requires their own reference number (customer's internal purchase order number or a contact name) to be recorded. Cust Ref# field can also be useful for linking multiple jobs for the same customer when using job lists, and for batch invoicing. |
Mode |
A job in progress will display Active in the Mode field. When a job is set to Ready, the Mode field will change to Ready. The Mode field name will change to a Purchase# field in a manufacturing job.
When a job is invoiced (no longer active in the system) this field name will change to Invoice# and will display the invoice number allocated to the job. If you select the ellipsis [...] to the right of the field, you can print or preview the invoice.

Note: The same invoice number might appear on several jobs where batch invoicing has been used. |
From# |
Jim2 will automatically populate the From# field from the Cust# field. This field denotes the customer who requested the job. You may override this default by selecting another card file in the usual way, if the From# (where the job originated) is different to Cust# to be invoiced. The card file for this code is available by selecting the hyperlink that appears when you move the cursor over the From# field name. |
Ship# |
Jim2 will automatically populate the Ship# field from the Cust# field. This field denotes the customer or site that this job will be shipped to or collected by upon completion. You may override this default by selecting another card file in the usual way, if the shipping address (where the job is to be delivered) is different to Cust# to be invoiced. The ship card file is available by selecting the hyperlink that appears when you move the cursor over the Ship# field name.
 |
Date In |
The date and time a job is entered is automatically recorded by Jim2. This field is read only and cannot be edited by users. |
Date Due |
This date is determined using the default due date set for all jobs in the Options menu. Customer-specific due dates can be set up in a customer's card file, which will override the system default. Users may change the date due manually using the drop-down calendar, which is available beside this field when in Edit mode. Each time the job is edited, this date will change to the date it was edited.
Note: The Date Due can only be changed when the job is in Edit mode, ie. if someone right clicks to add a comment in View mode, the Date Out will not change. |
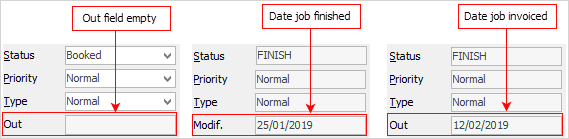
Out |
This field reflects the time/date the job was last edited by a user. This is a system generated date and cannot be modified. When the job is on Booked, the Out date will be blank. When the job is next edited, the Modif. field will change to the date it was edited. When the job is finished, the Modif. date will show the date it was finished. When the job is invoiced, this becomes the Out date.
 |
Item# |
When adding a job, the Item code identifies the product or service being sold. An Item provides a template for the rules of a job (sale, service or manufacturing). Selections can be made from the Item records by choosing the ellipsis [...] beside this field. A default Item can be set up in the Job Options menu. The Item can also define the default name (person nominated as responsible for this job), as well as any default stock that may apply.
Item# is a hyperlink, which will take you to the Item entered in this field. |
Description |
The description of the Item code from the Item record is automatically placed in this field. You can add to or change this field. |
Serial# |
If an Item requires a unique serial number, the user adding this job should note that number in this field. The Serial# field is an optional field, but can be configured via the Item record. If the serial number is to be included by default, then this job's Item must be allocated a serial number. Users will be prompted to enter the serial number if they try to save the job without filling in this field. |
Our Ref# |
Enter an internal reference number if required. |
Project# |
Select a project number that this job relates to, if required. Only if you are licensed for Managed Services or Managed Print Services. |
Fault Desc. |
This field only appears in a service job. The user entering a service job should enter a description outlining the customer's request. This field can also be printed on the invoice of this job for the customer's reference. If you don't enter any information in this field, when you save the job you will receive the following warning. You can proceed by selecting No.
 |
Invoice Desc. |
This field is used to enter a description outlining work completed (for service jobs) or product supplied (for sales jobs). This field can also be printed on the invoice of this job, for the customer's reference. This field is an optional inclusion to the Job form and should be configured via the Item record, however you can still enter text in this field. |
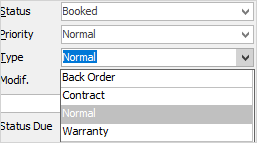
Status |
New jobs have a default status of Booked. When work commences on the job, a user selects the appropriate status from the drop-down list beside this field to describe the progress of the job. Refer to the Job Status section for more information on a specific status. |
Priority |
The default priority reflects normal workflow. To escalate or downgrade the job importance, choose from the drop-down list beside this field.
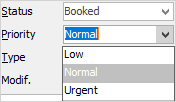
Job priority types are set up in Setups > Jos > Job Priority. |
Type |
The default type of either the sale or service that you provide. To apply an alternate job type, override the default using the drop-down list beside this field.
Note: The job Type field does not relate to whether the job is a sales or service job. Job type denotes the type of sale or service. These types can be defined in Jim2 Setups menu. |
Price Level |
A customer's price level is set in their card file. The price level is automatically populated when that customer is selected in a job. It is possible to override the price level for a particular job without changing the card file preferences for that customer. |
Qte Req. |
Tick this box if this job requires a quote. Use this tick box in an advanced list to show all jobs that require a quote.
Note: This tick box does not signify that this job has been converted from a quote, nor that a quote will be automatically created. |
Tax Paid |
GST eligibility is set in a customer's card file. Tax paid preferences are therefore automatically populated in the job. It is dependent on whether or not tax applies to their purchases. This affects stock pricing and can be used as a filter to identify tax records when making refund claims, etc. If you need to change the stock line tax codes for a particular job (for example, the job is for export), untick the Tax Paid box, and this will allow the stock tax codes to be edited on each line of the stock grid in that job. |
Name |
This field remains blank until an Item# is added. Once added, the name of the staff member who is responsible for work on that Item automatically appears. Unless Default Name Only is ticked within the Item, users can override the default using choices from the drop-down list beside this field.
Note: Available users must be ticked in the user selection grid in the Item record to be selected in the job. The user name will only appear in the name drop-down list in jobs when pre-configured in the Item.
Name is a hyperlink which will take you to that user's card file. |
Acc Mgr |
This field is updated with the customer account manager as per the card file entered.
Acc.Mgr is a hyperlink which will take you to that user's card file. |
Tax Total |
Choose from Tax Paid up (ex tax) or Tax Paid Down (inc tax). |
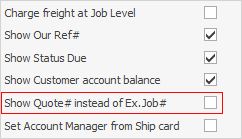
Ex Job#/Quote# |
If a job is returned for re-work, the original Job# should be added here to provide historical reference. Selecting the ellipsis [...] beside this field will instantly display the original job record. If the job was converted from a quote, this field will show as Quote# with the related quote number showing here. You are able to view the quote by selecting the ellipsis [...] within this field.
Note: Whether Ex Job# or Ex Quote# displays here is governed by what you have chosen in Tools > Options > Job:
|
Further information: