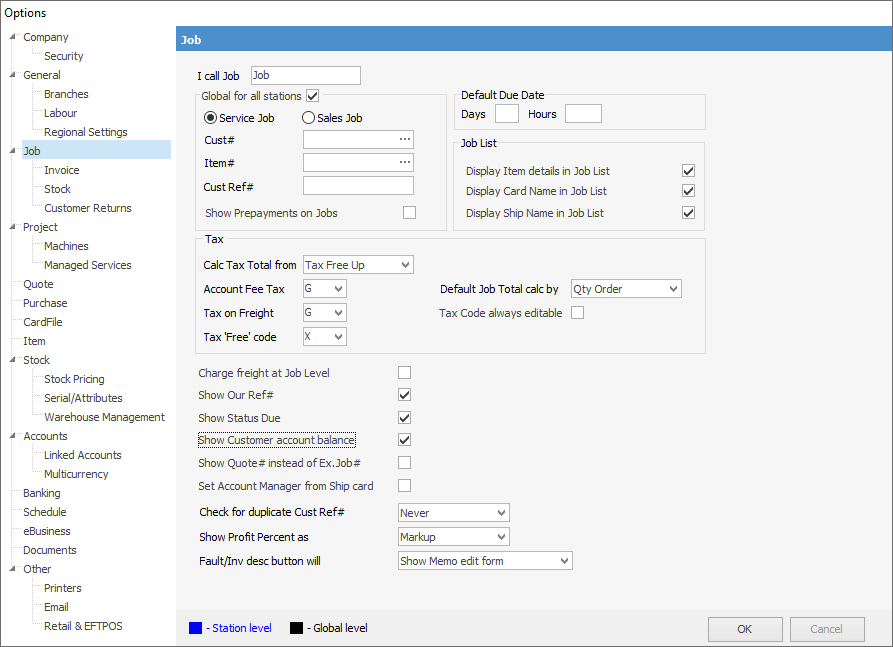
On the ribbon, go to Tools > Options > Job.
There are a number of specific job defaults set via Job Options. Each impacts globally on the function of jobs, ie. every user accessing jobs is affected by the options set here. The significance of each is described below.
These options are designed to reduce repetitious user input, improve accuracy, and set customer and management expectations for work performed. They should represent the general conditions or most frequently used work practices you would like Jim2 to manage within jobs.

Field |
Explanation |
|---|---|
Job Name (I call Job) |
The default name is Job, however you can rename this to whatever you need, eg. Sale or Order. Just enter desired name into the field and this name will appear in place of Job throughout Jim2.
You will need to log off and back on again for these changes to take effect. |
Global for all stations |
Tick this box if you require all workstations to see these settings. |
Job Type (Service or Sales) |
Select the most common type of job that you perform, either sales or service. When users select Add Job, the new Job form will default to show fields suitable for that job type. Upon entering the Item, the job will automatically change to the correct type, ie. a new job begins as a Sales job, however once an Item is selected that relates to service, the job will change to Service.
These defaults can be set at a workstation level, eg. at a POS station you might set the default to Sales, but in other areas you might prefer to set it to Service. |
Sales/Service Job Defaults |
If Sales is selected as the most common job you perform, you can enter a default customer, such as Enduser or Consumer (there must be a card file set up first) and a default Item (such as Counter Sale or Phone Order) for each new job added. This is particularly handy in a point-of-sale business where speed of invoicing is essential. Users can override the defaults by selecting a specific customer or Item from the drop-down menu beside those Job form fields. If this option is left blank, each sales job you add is ready to accept codes for specific customers and Items.
Similarly, if Service is selected as the most common job you perform, you can set a default customer (such as the name of your largest customer, or a customer for whom you are currently doing a large number of jobs) and a specific Item for each new job added. This is particularly handy if you have received a batch of repairs, all requiring the same work to be performed. |
Cust# |
You can enter a default customer card code for your sales or service jobs. This can be changed at any time. |
Item# |
You can enter a default Item code for your sales or service jobs. This can be changed at any time. |
Cust Ref# |
You can enter a default customer reference number for your sales or service jobs. This will not be displayed on manufacturing jobs, and can be changed at any time. |
Show Prepayments on Jobs |
By default, the Prepaid $ and Balance Due $ Total fields on jobs/orders are not displayed. Ticking this option will override this. |
Default Due Date |
Job turnaround time is one of the most basic key business performance indicators. How well your team meets job targets in relation to this expected time frame should be closely monitored. The number you enter in this field should reflect the average or expected number of trading days it takes to fully process a job. Jim2 will use this figure to automatically calculate the default date due for all jobs. This calculation directly relates to the trading hours you have set in General Options. Remember, this is a global job option, however, the provision to set a specific turnaround for a particular customer is made at the card file level for that customer.
Job Due Date Not Changing This may be because Required Days and Required Hours fields on the customer card file have zeroes entered. Do not enter zeroes in these fields if you wish Job Options to override the card file. If you enter 0 in either field, this will override the Job Options. |
Job List – Display Item Details in Job List |
This option allows you to choose whether you would like the job list to display the Item details – displaying the Item details would be more useful for service and manufacturing companies than a sales company. |
Display Card Name in Job List |
Ticking this box will display the Customer Name column (in addition to the Cust# column) within a job list. |
Display Ship Name in Job List |
Ticking this box will display the Ship Name column (in addition to the Ship# column) within a job list. |
Calc Tax Total From |
Choose from Tax Free Up (ex GST) or Tax Paid Down (inc GST). This will then be the default editable field in objects for entry of amounts. |
Account Fee Tax |
If you are going to charge an account fee, you will need to select which tax code applies so that Jim2 can calculate and report any tax automatically. |
Tax On Freight |
This option allows you to set the most frequently used code for tax (tax code G), but if you are primarily involved in exporting, you would be using a varied rate. Choose the most commonly used code for your business.
Users can override this default in special circumstances by selecting an alternate code from the drop-down menu beside the Freight Tax Code field in the Job screen. |
Tax 'Free' Code |
This allows you to nominate a code to be used when selecting a job as tax free. This will apply to stock, account fees and freight tax codes. |
Default Job Total calc by |
This option allows you to select either Qty Order or Qty Supplied as your default basis for calculating the job total. |
Tax Code always editable |
Tick if you wish to always be able to edit tax code. |
Charge Freight at Job Level |
You have the choice of adding freight on the Invoice Details tab at the bottom of the job, or adding a stock record for freight and including it in the stock grid of the job. If you want to use the second option, you should tick Charge Freight at a Job Level. Alternatively, you can enter a freight amount on the Customer tab of a card file, and this will automatically drop into the Invoices tab on adding a job. See How to add freight to jobs. |
Show Our Ref# |
Tick this box to show the Our Ref# field on the job form. This field can be used for any internal reference/search you would like to include in the Job form (eg. could be an OEM warranty repair number). You could also generate a reference using an event script. |
Show Status Due |
This option will add a new field to the job form, and two new columns to the job list automatically to display status due. |
Show Customer Account Balance |
This option will show the account balance at the top right of the screen next to the customer's name in jobs and quotes. This can be useful if your collections are a little slow, and you have trained your sales staff to follow up.

|
Show Quote# Instead of Ex Job# |
As different businesses run in different ways, Jim2 has the option of choosing whether you want to display an existing job number field on a job, which is then linked to that existing job number – and you can switch from one to the other. Other businesses may want to use this field for quote number and therefore link to the quote. To unlink, untick Show Quote# instead of Ex.Job# and vice versa. |
Set Account Manager from Ship Card |
Tick this box if you have customers with multiple sites and central billing. For reporting purposes, the account manager will then be picked up from the ship card file as well as the customer card file. |
Check for duplicate Cust Ref# |
Tick for Jim2 to warn when there's a duplicate customer reference number for the same customer. Choose from All Jobs, Never or Active Jobs Only. |
Show profit percent as |
This gives you the option to show profit percent as markup or margin (GP%). |
Fault/Inv desc |
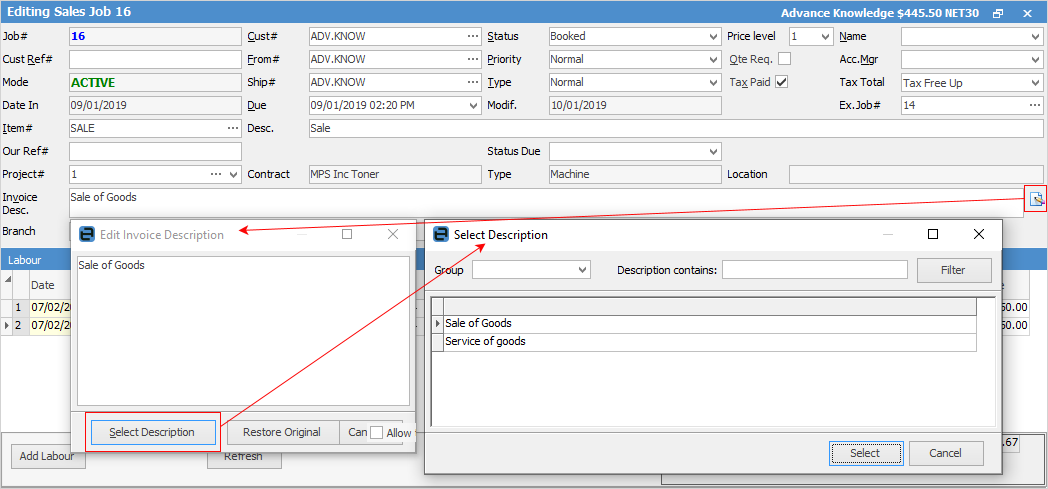
You can choose either the Show Memo edit form or Show Description Lookup form when you select the icon within a job (see image below). If you have standardised descriptions that don't vary much, then the second option would be best. However, if you have non standard descriptions that vary from job to job, the first option would suit best.
 |
 |
You can change most of these settings at any time. |
Further information: