
To edit (ie. add payments), view or report on a creditor or a group of creditors, filter the available creditors using the Creditors list.
To access the Creditors list select the Creditors icon in either one of these ways:
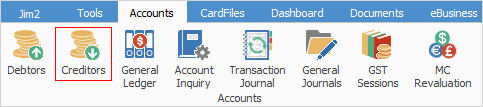
▪on the ribbon, go to Accounts > Creditors
▪in the Nav Tree, right click on Accounts and select Creditors.

Hyperlinked fields
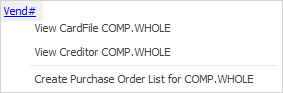
Some fields provide hyperlink access to view associated information. Hovering the cursor over the wording to the left of the field will display the label name in blue if it is hyperlinked. Click on the label and select the option to View. Vend# – will open the cardfile of the code entered here.
Field |
Explanation |
|---|---|
Vend# |
Vendor's card code. |
As of |
Enter a specific as of date, if desired. |
Terms |
Produce a list based on terms of payment, eg. COD, Net 7 days, etc. |
Date Due> |
Date due is after the date entered here. |
Date Due< |
Date due is before the date entered here. |
Groups |
Select any cardfile groups for filtering. |
Contact |
Contact name from the cardfile. |
Name |
The vendor's name. |
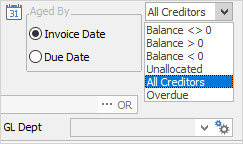
Aged By |
Choices are: by Invoice Date or by Due Date.
The list can also display all vendors, regardless of whether they have a balance or not. This is great for sending out newsletters, and increasing sales. To use this feature, select All Creditors and click Run.
 |
 |
Jim2 includes a hyperlink from the vendor's cardfile straight to their creditor record – this hyperlink can be accessed by hovering over the Vend# link in a purchase order, then choosing View Creditor.
When finishing a purchase order, Jim2 also provides access to the current creditor's balance. |
Sorting, searching and grouping are available as per other lists in Jim2. Select the column header in the grid, then drag it to the Group By area to group.

Use this list to locate a certain vendor or group of vendors by using the filters in the top section of the form.
Balance Filter |
Explanation |
|
|---|---|---|
Balance
 |
In the dropdown list choose from one of the six options here: |
|
Balance <> 0 |
Creditors with a balance greater or less than 0. |
|
Balance > 0 |
Creditors with a balance greater than 0. |
|
Balance < 0 |
Creditors with a balance less than 0. |
|
Unallocated |
Creditors with unallocated credits, ie. credits not applied to invoices. |
|
All Creditors |
View all creditors, whether they are owed money or not. |
|
Overdue |
Creditors with overdue invoices not yet paid. |
|
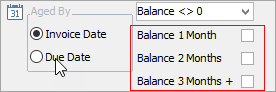
Balance 1 Month checkbox |
Select creditors who are still owed after 30 days but less than 60 days. |
|
Balance 2 Months checkbox |
Select creditors who are still owed after 60 days but less than 90 days. |
|
Balance 3 Months + checkbox |
Select creditors who are still owed after 90 days or more. |
|
Grid result groups

Not all columns are showing here
Any vendors who are marked as inactive in their cardfile will be displayed in this list with the text in a grey colour (ie. greyed-out).
Fields in the list:
Fields |
Explanation |
|---|---|
Code |
The vendor's card code. |
Name |
The vendor's name. |
Total |
The vendor's total balance. |
Current |
The current balance. |
1 Month |
The 30 days balance. |
2 Months |
The 60 days balance. |
3 Months + |
The 90 days and over balance. |
Follow Up |
The follow-up date of any notes that may have been entered for this creditor. |
Terms |
The trading terms for each listed vendor. |
Credit Limit |
This field displays any credit limit imposed by the vendor, if set up in the vendor's cardfile. This will display in red if the limit has been exceeded. |
Overdue |
Boxes in this column are automatically ticked by Jim2 if there are any overdue invoices. |
Amount Overdue |
Any overdue amount appears in this column. |
Branch/SubBranch/GL Dept |
These columns only appear if Branches are in use. |
 |
For those creditors listed, the Total column will show any unallocated credits (shown in green text within the list). Also, the bottom of the list shows the total $ amount for several columns of the list. |
If user security allows it, right click within the list grid, select Export Data and save the list information as an XLSX file.
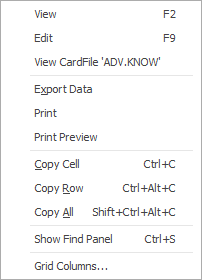
Right Click Option |
Function |
||
|---|---|---|---|
View |
View the highlighted object. |
||
Edit |
This will bring up the Creditor in Edit mode. |
||
View CardFile |
View the highlighted cardfile. |
||
Export Data |
Exports data from the grid to a spreadsheet file. |
||
Print the list. |
|||
Print Preview |
Preview how the list will be printed. Within this area you can change the orientation of the page. For instance, if there are more columns than will fit on a portrait page, change it to landscape. |
||
Copy Cell |
Copy the highlighted cell. |
||
Copy Row |
Copy the entire highlighted row. |
||
Copy All |
Copy all, which can then be pasted into a spreadsheet |
||
Show Find panel |
Opens the Find panel:

|
||
Grid Columns... |
Allows adding more columns. Also allows removal of columns. Select the column to add, then drag it to the position required in the columns within the grid. To remove, click and drag to the Grid Columns... window, or drag down away from the header area. |
There are a number of other useful right click options, all self explanatory. Grid Columns... allows to add further columns to the grid.
Further information
Creditors Allocate Payments Grid
How to