


This section explains the field headings in the Asset List header.
Field |
Explanation |
Asset# |
Enter an asset number here to return a list for just that asset, or leave it blank to run a full list of assets. |
Owner# |
Entering a (customer) card code here will display a list of all assets for that owner. |
Status |
Select a status to display a list of all assets for that status. |
Name |
Selecting a name will run a list of assets for that name only. |
Cust Ref |
Produces a list of all assets using this customer reference. |
Ship# |
Either the same card code as the Owner# or a Ship card related to the Owner# will run a list based on the entry here. |
Item# |
Produces a list of all assets using this Item. |
Item Make |
The Item make as appears on the Item. |
Item Model |
The Item model as appears on the Item. |
Request By |
Produces a list based on the Request By method:
 |
Serial# |
Entering a serial number will produce a list for an asset with that serial number only. |
Contract # |
Entering a project number will produce a list of assets for that number only. |
Branch/SubBranch |
These fields will be populated if using branches, however they can be changed using the dropdown menu. |
Advanced List Fields |
|
Dates |
Narrow down the search based on dates in and out or warranty dates. |
Groups |
Select an Asset/Item group or non report group to narrow down the search. |
Owner |
Narrow down the search by suburb, postcode, account manager or cardfile group. |
Sorting, searching and grouping are available as per other lists in Jim2. Select the column header in the grid to sort, then drag it to the Group By area to group.

Not all fields are displayed in this image
|
Some letters in the field names within the header are underlined, eg. Cust#. Using Alt+ the underlined letter will jump to the field beside that heading. |

This section explains the field headings in the Asset List. Refer to Lists for details on sorting, naming, grouping, etc. The headings may not be strictly in this order.
Field |
Explanation |
Asset # |
Asset number. |
Owner# |
The name of the owner (customer, or entity responsible for payment) of the asset. |
Serial # |
Serial number of the asset (if applicable). |
Ship# |
Ship card code. |
Asset Mgr |
The Name selected on the asset. |
Item# |
Item number. |
Item Desc |
Item description, which is normally populated by the Item. This information can be changed or added to. |
Item Model |
Model, which is populated by the Item. |
Item Make |
Make, which is populated by the Item. |
Warranty In |
The date warranty commenced. |
Warranty Out |
The date warranty expires. |
Status |
The status of the asset, ie. Booked, etc. |
Branch/Sub-Branch/GL Dept |
The branch, sub-branch and GL Department if branches are being used. |
Request By |
The way reads are requested from the owner, based on what has been entered on the asset. |
|
When viewing an asset from a list, click the arrow in the quick access toolbar for the next/previous asset in that list:
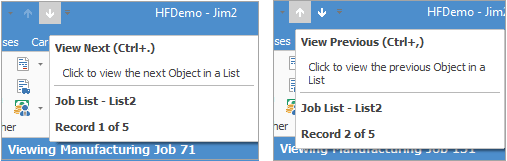
Shortcut keys: Ctrl+. moves to the next object in the list Ctrl+, Moves to the previous object in the list |
If user security allows it, right click within the grid, select Export Data and save the list information as an XLSX file.
Right click options in Grid

Right Click Option |
Function |
||
|---|---|---|---|
View |
View the highlighted asset. |
||
Edit |
Edit the highlighted asset. |
||
Add Asset to Non Report Group |
Will allow adding the highlighted asset to a non report group. |
||
Export Data |
Exports the list to a spreadsheet. |
||
Export Grid |
Exports the grid to a spreadsheet. This is particularly useful if the grid has more than one header row, as it will export all header rows. |
||
Print the list. |
|||
Print Preview |
Preview the list to be printed. |
||
Copy Cell |
Copy the highlighted cell. |
||
Copy Row |
Copy the highlighted row. |
||
Copy All |
Copy all, which can then be pasted into a spreadsheet |
||
Show Find panel |
Opens the Find panel:

|
||
Grid Columns... |
Allows adding more columns. Also allows removal of columns. Select the column to add, then drag it to the position required in the columns within the grid. To remove, click and drag to the Grid Columns... window, or drag down away from the header area. |
Right click options in the Nav Tree

After the top 3 (which are self explanatory), these options mirror what is on the ribbon in the Assets tab, except for the last tab, which will Reset to Default all tabs.
Further information