
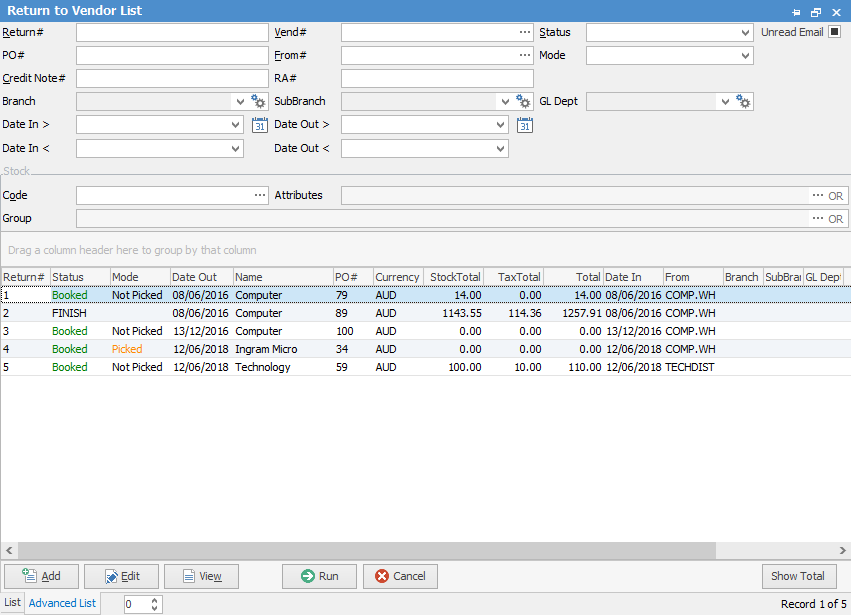
Showing the Advanced List
Sorting, searching and grouping are all available as per other lists in Jim2. Click on the column header in the grid you wish to sort, then drag it to the Group By area to group.

|
You will see some letters underlined in the field names within the header, eg. Vend#. Using Alt+ the underlined letter will jump you to the field beside that heading. |

The Return to Vendor (RTV) list can collate information from your return records in real time for cross reference, and use archived data if required. You can print a Return to Vendor list from the Reports section of the ribbon:

When adding, editing or viewing, the top section of the Return to Vendor form records information relating to the return number, date, vendor information, status, notes and PO number.
In this list you can select the following fields and combinations of fields, to generate a Return to Vendor list:
Field |
Explanation |
Return# |
Return order number. |
Vend# |
The vendor (person you owe) card code within Jim2. |
Status |
The status of the return order. |
PO# |
The original purchase order number. |
From# |
The supplier (person who supplied the goods) card code within Jim2 (may not always be the vendor). |
Mode |
Choose from Not Picked, Picking, Picked. |
Credit Note# |
The vendor's credit note number. |
RA# |
The vendor or supplier's RA number. |
Branch, SubBranch, GL Dept |
Choose from these drop-down lists if applicable. |
Date In > |
Use this to select the date in on or after the date selected to locate a return to vendor. |
Date Out > |
Use this to select the date out on or after the date selected to locate a return to vendor. |
Date In < |
Use this to select the date in on or before the date selected to locate a return to vendor. |
Date Out < |
Use this to select the date out on or before the date selected to locate a return to vendor. |
Code |
The stock code to locate a return order. |
Group |
The stock group to locate a return order. |
Attributes |
The attributes to locate a return order. |
|
On the right-hand side of the Group field within the list you will notice OR – if you click this, it will change to &. This relates to how you want to use groups within your search. If you select two groups and want to find things that are in both groups, use the & option. If you want to search two groups and find anything that is in either of those groups use the OR option. In the list header, double clicking on the word Group at the beginning of the Group field will turn the field green to indicate that group selection is inverted. For example, select objects that are not in these groups. |

|
Some of the fields within Jim2 are hyperlinks and can take you from one form to another. In the Return to Vendor form there are two hyperlinked fields:
|
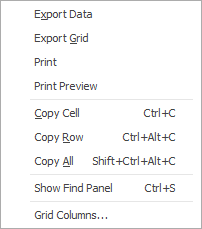
Right-Click Options in the Return to Vendor List
Right Click Option |
Function |
||
|---|---|---|---|
Export Data |
Export data from the grid to a spreadsheet file. |
||
Export Grid |
Exports the grid to a spreadsheet. This is particularly useful if your grid has more than one header row, as it will export all header rows. |
||
Print the list. |
|||
Print Preview |
Preview the list to be printed. |
||
Copy Cell |
Copy the cell you have clicked on. |
||
Copy Row |
Copy the entire row you have clicked on. |
||
Copy All |
Copy all, which can then be pasted into a spreadsheet |
||
Show Find panel |
Opens the Find panel: 
|
||
Grid Columns... |
Allows you to select more columns to add to the grid. |
Right Click Options in the Nav Tree
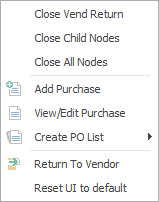
After the top 3 (which are self explanatory), these options mirror what is in the ribbon in the Purchases tab, except for the last tab, which will reset all tabs to default.
Further information: