Please see here for adding a document within Jim2Cloud, as the process is different to what is stated here.

The following explains how to add a document to objects, ie. cardfile, job, quote, Item, purchase/expense, stock record.
Add a new document in a number of ways:
▪Add Document from File – enables a user to add a document to Jim2 from their local or network drive.
▪Add External Document – enables a user to add a document to Jim2, which is saved to a place external to Jim2. This functionality is great for linking images stored online.
▪Add Document From Clipboard – enables a user to add a document from the device's clipboard, which is particularly useful where they are unable to access documents from a local/network drive.
|
Note: You can also select multiple files to copy and paste at the same time. If you do not wish to link them to an object, they will appear in the Root directory of Documents within Jim2. |
▪Drag and drop a document (file) directly onto Jim2. This can be performed from most screens, including job, quote, Jim2 email, etc. In email, you can drag attached documents/images directly onto the Comment section of the object you have open and it will be added to the Documents tab. You can then view the document in the preview pane. This is handy in instances where you have received an invoice from a vendor and would like to validate it against the actual purchase order.
 |
Drag and drop does not work in Jim2Cloud. Please see here for the correct ways to add documents in Jim2Cloud. |
Once an option has been selected, users will complete the document details, including choosing a folder, category, tags, usage, etc.
 |
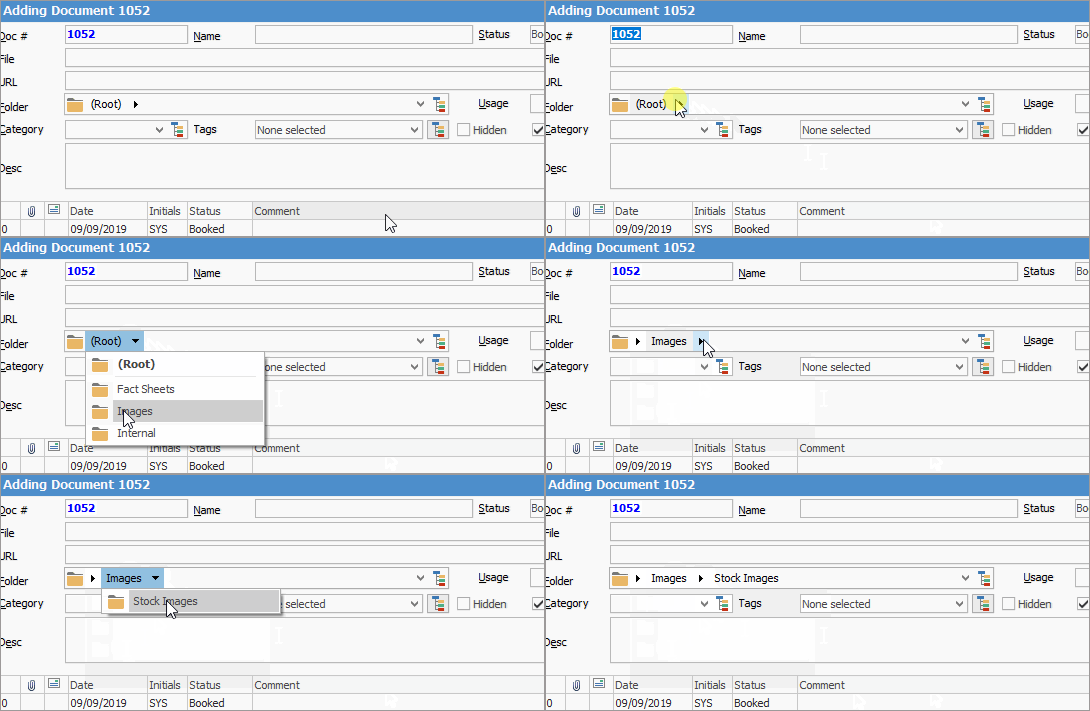
To ensure the document appears in the correct folder, select Root, select the sub-folder, then choose further sub-folders until the correct folder is selected.
 |
To complete the process, click OK.
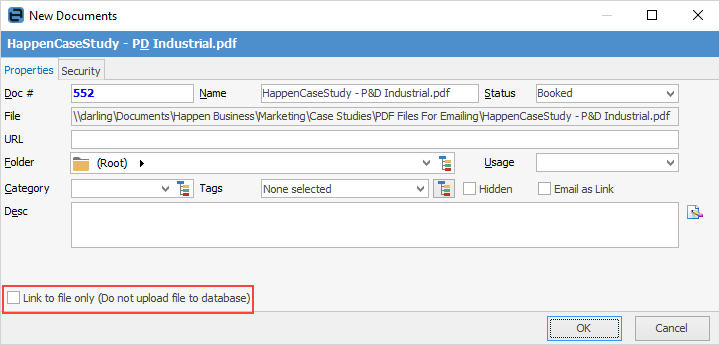
Above image shows the screen that opens when dragging and dropping a file
A new document will be created, and allocated a unique document number (Doc#).
Documents can be loaded from a file, or can point to an external file or website (tick Link to file only (Do not upload file to database), or both. In the case of both, the file is available for viewing and maintaining within Jim2, with a copy stored externally, located via the URL.
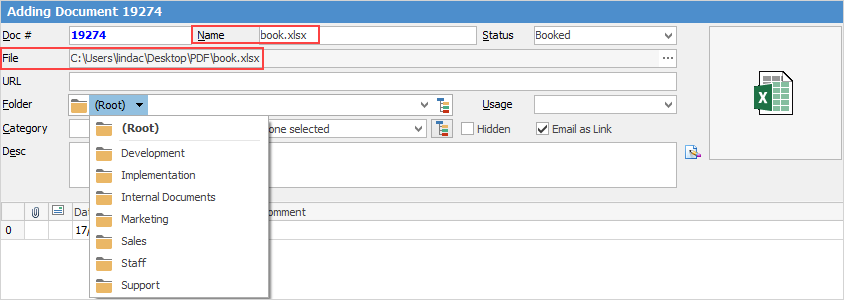
On the ribbon got to Documents > Add Document. Choose the document by clicking the ellipsis [...] at the end of the File field.

An Open File screen will appear. Select the file to add, then click Open.
The file will be added, a thumbnail image created (where possible), and the Name and File fields completed.
At this point click Save and the document will be added, although the document’s folder, category, tags, and importantly, its security, may need to be changed first.
 |
Similar to adding a document via a file, on the ribbon go to Documents > Add Document and enter or paste the URL or weblink. As already mentioned, a document can be from a file (stored within Jim2) and have a URL linking to an external copy of the same file. This is used when inserting a document into an email (using the URL link, rather than the actual file).
 |
A document can also be added using the copy and paste functionality. Copy the file to the clipboard. On the ribbon, go to Documents > Add Document > Add Document from Clipboard and enter any other relative information required in the New Documents screen.
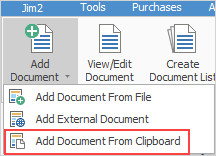
A document can also be added from the clipboard by clicking Add Document from Clipboard in the Quick Access toolbar:

This is particularly useful when running Jim2 remotely (via RDP) where drag/drop functionality is not supported. |
This is by far the simplest and quickest way to add any new document, in particular if adding one related to an object (job, quote, etc.). Locate the file in Windows File Explorer. Now drag the file onto the Jim2 object. When the mouse pointer changes as below, release the mouse button and a New Documents form will appear. See above for information on folders. Fill out the required fields, and click Save. 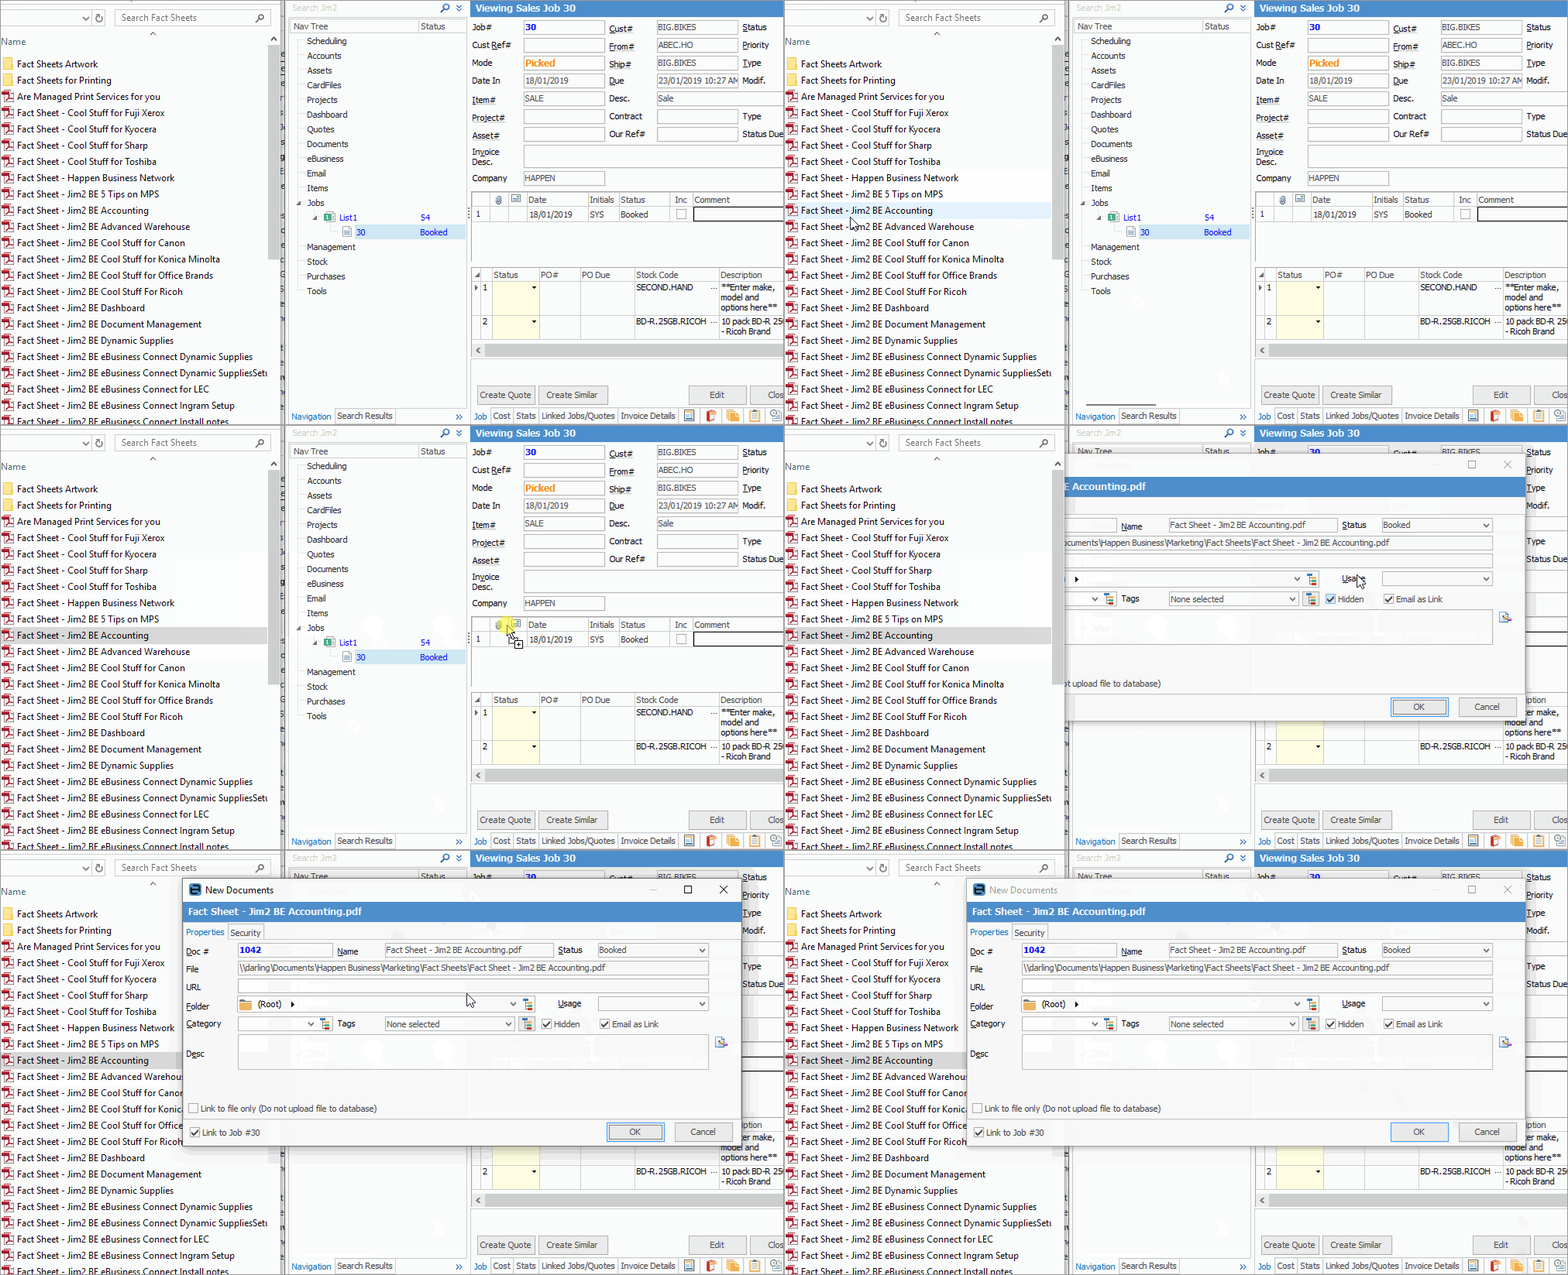
|
Add multiple documents in the same way as above, by selecting multiple documents from Windows File Explorer, using the standard Windows Control or Shift mouse click. From File Explorer, hold down the Ctrl or Shift key and choose the files to be added. Now, drag them onto Jim2, releasing the mouse button when the
The same New Documents screen will appear for editing the common properties, such as folder and security, for all selected documents.
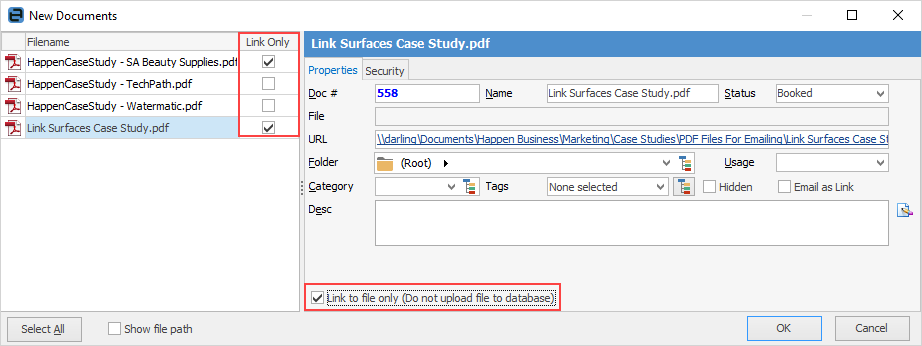
Adding bulk documents can also be configured to create a link to the external file location or URL, rather than store the document in the Jim2 database.
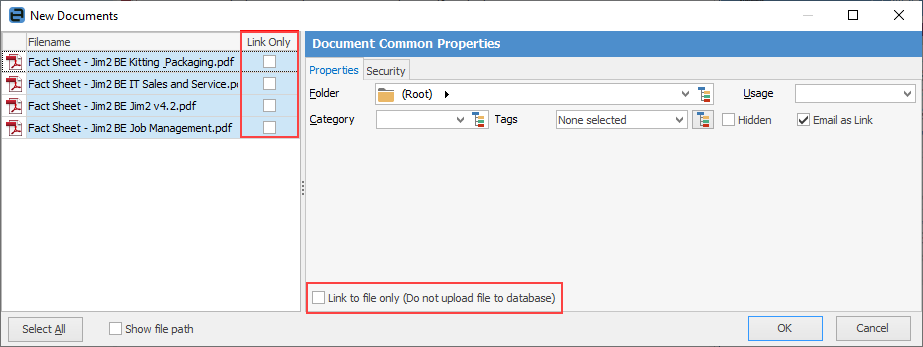
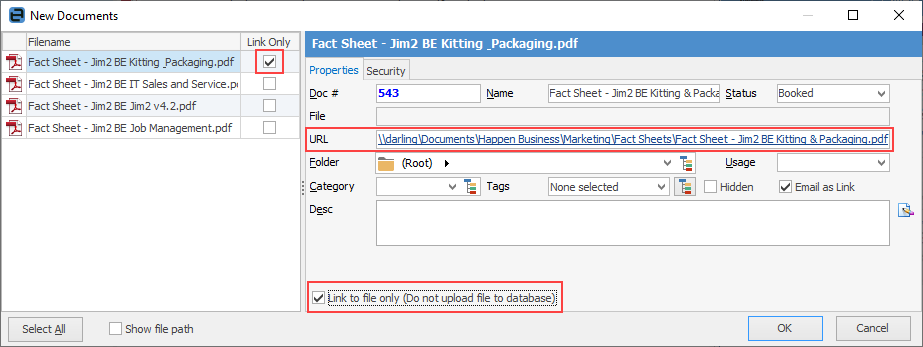
Select the document in the list, tick Link Only, then enter the URL for that document. Continue in this way down the list.
 |
Often, a file that is related to an object (job, quote, etc.) in Jim2, so it should be added as a document linked to that object.
For example, to add a photo to a job, open the job in Jim2, then drag and drop the file directly onto the job. The New Documents form will appear with an additional ticked box, Link to Job # XXXX, and link it to the open job it was dropped on. Make any other changes/additions before clicking OK.
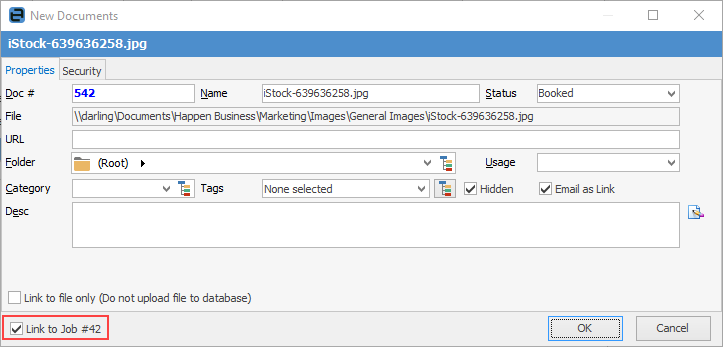
Any object in Jim2 that has a Documents tab can be a drop target, and can have linked documents. |
What if I drop a file onto a new or existing document? ▪If the document is in Edit mode, the following warning will appear:  •If Yes is clicked, the new file will be added to that document.  The added document will appear in the Document Versions screen at the bottom in the Document tab. ▪If it is an existing document in Jim2 of the same name, it is assumed the document is being updated, so choose how to add the document (see Version Control). 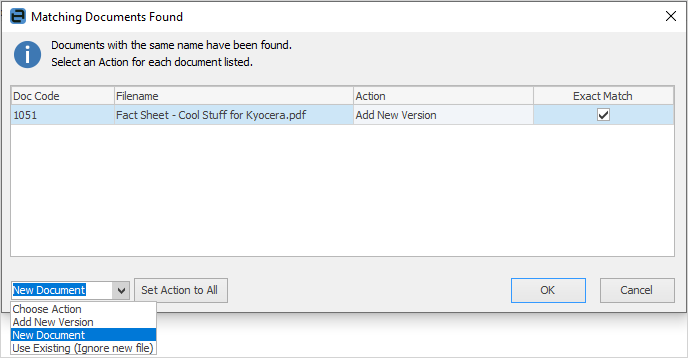 |
Files can also be dragged from some other programs directly into Jim2, ie. Microsoft Outlook emails and attachments. Follow the same drag and drop procedure as above, clicking and dragging the attachment (or entire email) onto Jim2. |
Any email that arrives in Jim2 with an attachment allows for dragging that document directly from the email preview pane onto a Jim2 object, ie. job, quote, purchase order, etc. (wherever there is a Comment grid).
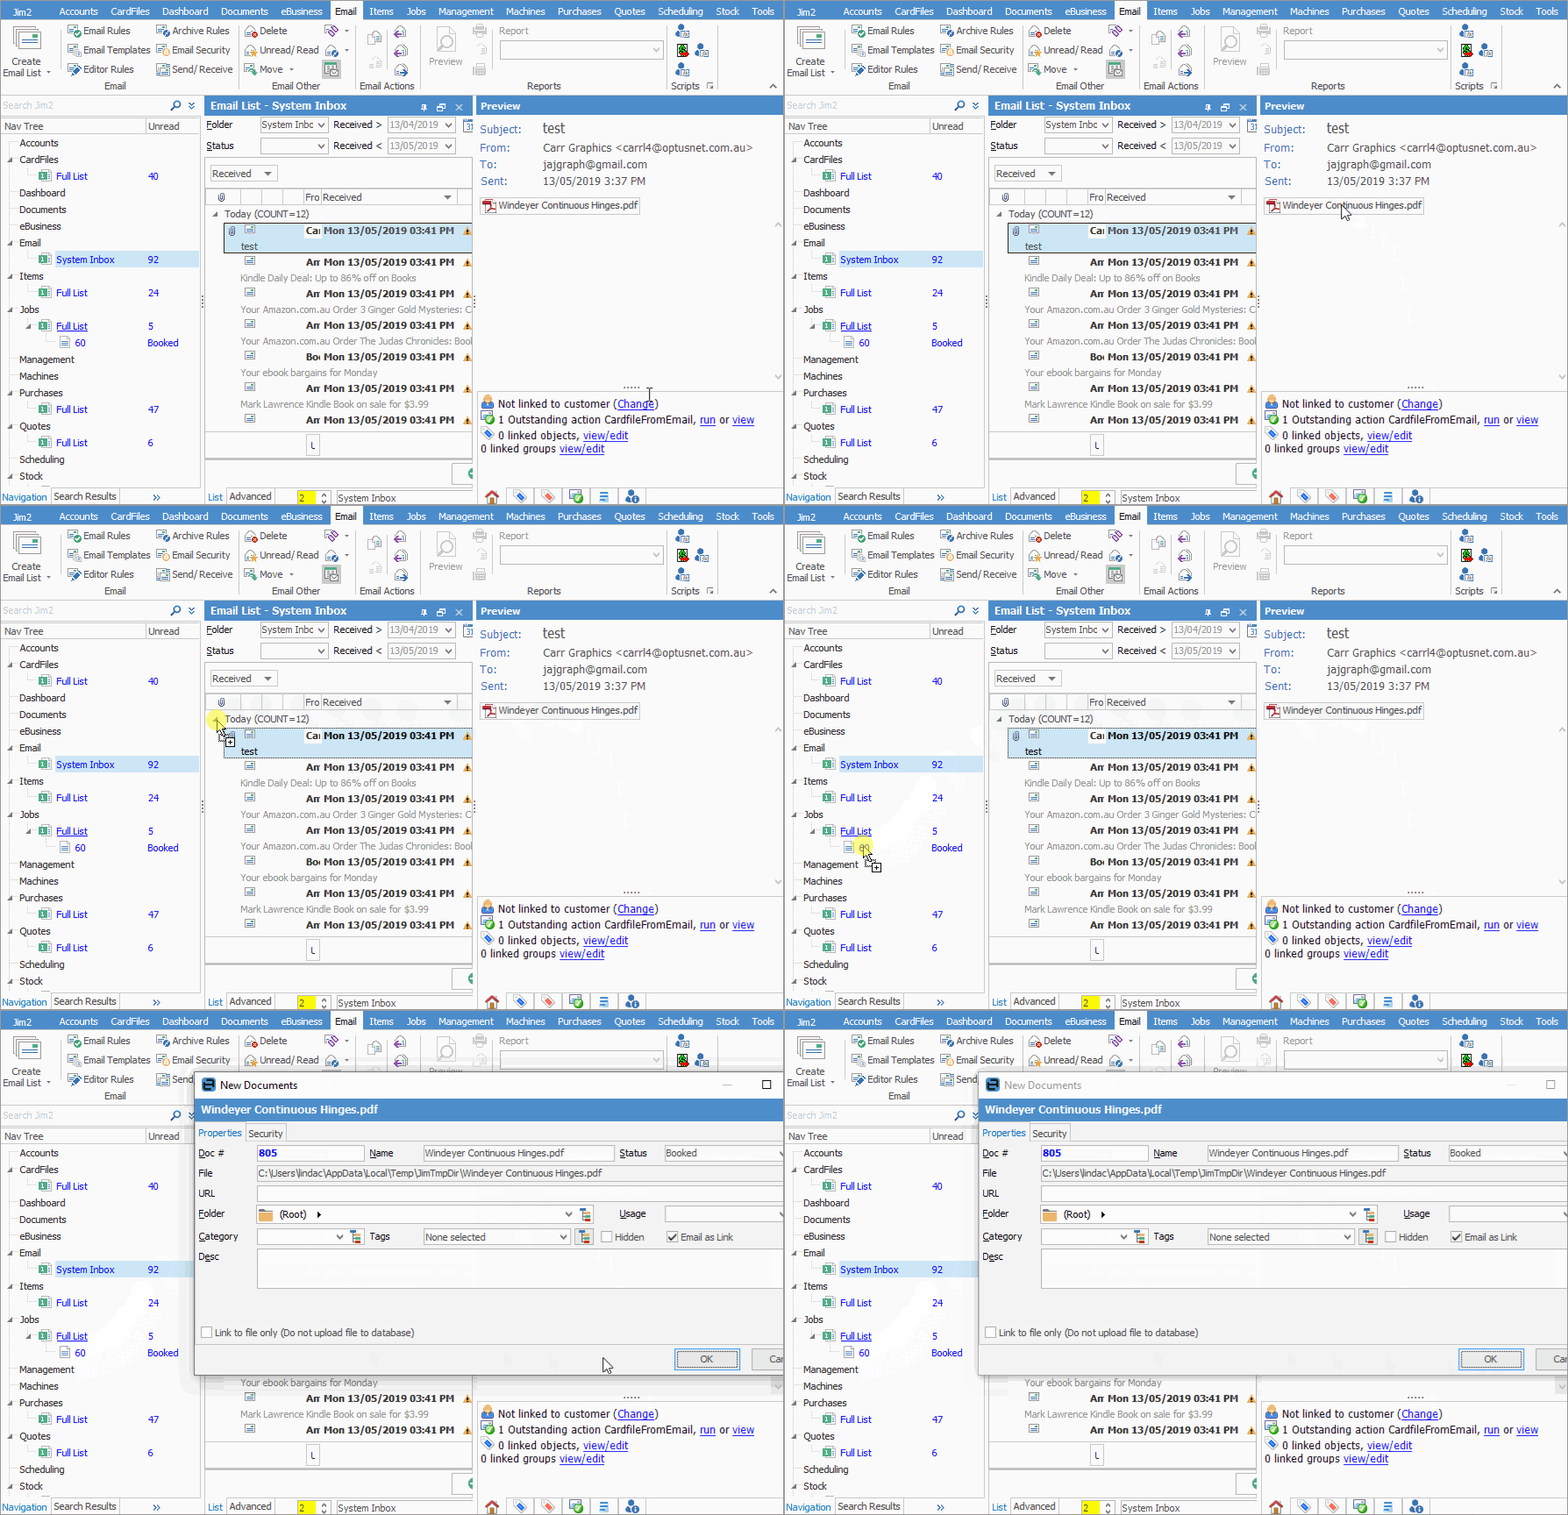
This is especially useful when, for example, someone emails a Word document or a spreadsheet, etc. that is to be saved directly against an object. Much simpler than sending different versions of a file back and forth via email. This is also how you can add documents to finished objects.
Another use for this is, when in a purchase order and the vendor's invoice has arrived. You can open the invoice from the Documents tab after dragging onto the purchase order, then you can compare the invoice to the actual order stock grid to validate the purchase order. |
Documents can be added in bulk using the Bulk Link Document to Stock report (the document file name must match the stock code, and the document has either Image or Picture usage). The image must already be in Jim2. This is performed via Management > Reports > System Reports.
 |
Using either drag and drop (not available in Jim2Cloud) or copy and paste allows linking of the document to an external file, rather than uploading it to the Jim2 database. As shown here, select the document and tick Link Only, then tick Link to file only (Do not upload file to database). When viewing this document within Jim2, it will actually be opening the external file.
 |
When adding a document to Jim2 that has the same name as an existing Jim2 document, a confirmation message will appear for choosing how to handle the addition. However, if there is more than one document in Jim2 with the same name, there will be no prompt, and it will be added as another new document of the same name.
When duplicate document names are detected, select an action for each document in order to proceed:
 ▪Add New Version – adds the new document as a new revision of the existing document. ▪New Document – creates a new Jim2 document. ▪Use Existing – retains the existing document, rather than adding the new document. |
|
Since all documents are stored within the Jim2 database, the Jim2 backup file size will increase accordingly. See Database Size Maintenance for more information. |
Further information

 appears.