
Please see Overview for an explanation of Machines.
On the ribbon, go to Tools > Options > Machine > Machines and select the default Job Types as set up previously. These become the defaults that are entered into the corresponding generated jobs.
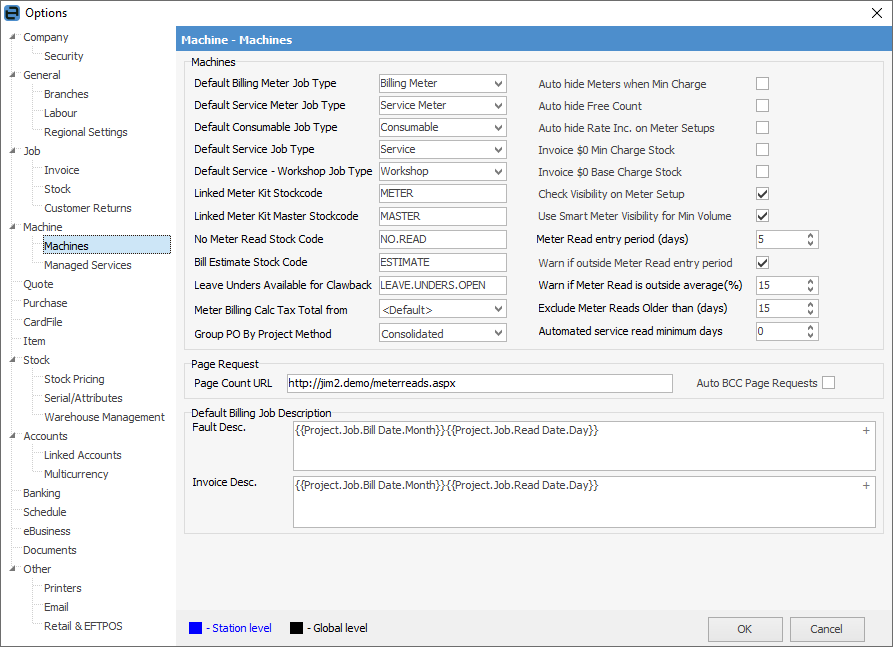
1.Set the default job types to the Job Types you have created. This will make it easier later to filter a list of jobs using the Type field.
2.Set the Linked Meter and Master Meter Kits to the dynamic kits you have created. These will be used to summarise the meter reading information when you have multiple lines generated by a billing job. By creating these stock codes and adding here, billing can be bundled into a meter billing kit if. A meter billing kit allows multiple stock codes to be billed against a meter, for example split service and finance. These are typically hidden on the invoice with only the kit header displayed. The meters must be linked for the billing kit to work.
3.Set the No Meter Read, Estimate and Leave Unders Available for Clawback to the relevant stock codes.
▪No Meter Read Stock Code – Including a non-depleting stock code here will enable a No Read option when billing a machine. This simplifies the display of billing jobs to indicate that no read was received, without having to include a zero quantity line for each meter on the machine. It also allows the option of performing a No Read on a master contract. Selecting this option when billing a master contract will perform a No Read for all machines on the master contract that have yet to have a read entered against it. Afterwards, it will then perform the usual master contract calculation. This can save a large amount of time if there are numerous machines on a master contract for which no read has been received.
▪Estimate – The problem with billing averages is, the user sometimes provides an actual read that is smaller than the average, and as Jim2 treats averages as a real read, some administration is required to return the original reading and re-invoice that reading once the actual reading is received. This problem is overcome with an Estimate, as Jim2 will use the estimate stock to bill the estimate reading at the time, and later take that reading into account when the actual reading is provided. In this way, Jim2 self balances automatically in cases where the actual reading is lower than the estimated read.
▪Leave Unders available for Clawback – In some volume contract arrangements, if the customer is billed unders they are made available in future periods for clawback. This stock code is used to identify on contracts that have this arrangement that Jim2 should leave the unders open for clawback in a later period. In addition, if Jim2 is billing a certain period, and the Leave Unders stock code is not present on the previous billing jobs, it will assume that unders are now closed for clawbacks.
4.Meter Billing Calc Tax Total from – choose from Tax Paid Down or Tax Free Up.
5.Meter Read Entry Period (days) – This indicates the number of days before the Next Bill date of a project that a job will be created. For example, if this value is set to 5 (the default) and the Next Bill date of the machine is 28 Feb, consider the following scenarios:
▪Attempting to process a read on 22 Feb will:
▪For manually entered reads – give a warning that it is outside the meter billing period.
▪For incoming reads via an MPS connector – processing will fail.
▪Attempting to process the read on 23 Feb will:
▪For manually entered reads – no warning will be shown.
▪For incoming reads via an MPS connector – processing will continue.
▪Attempting to process the read on 6 Mar will:
–For manually entered reads – give a warning that it is outside the meter billing period.
–For incoming reads via an MPS connector – processing will continue.
6.Exclude Meter Reads Older than (days) – This indicates the maximum age that a read can be when processed via an MPS Connector. This is different to the meter read entry period because it refers to the date the read was taken, not the date the read was processed. These two settings can work in concert to allow for reads via an MPS Connector to be processed at an appropriate time using the best available read. Consider the following scenario:
▪Machine has next bill date of 28 Feb.
▪Meter Read Entry Period (days) = 5.
▪Exclude Meter Reads Older than (days) = 15.
–A read is received via an MPS Connector on 12 Feb. This read is permanently failed because the date is outside the meter read entry period (it is before 23 Feb, which is 5 days before 28 Feb), and the read would be too old to use even if it was inside the billing screen (it is before 13 Feb, which is 15 days before the 28 Feb).
–A read is received via an MPS Connector on 13 Feb. This read is immediately failed, but it is rescheduled to be attempted again. This is because, although it is too early to process the read (13 Feb < 23 Feb), if it were inside the billing screen this read would not be too old to use (13 Feb > = 13 Feb).
–Attempts to process the read from 13 Feb are made for the next few days, each time failing because it is too early to process, and each time being rescheduled to try again. On 18 Feb a new read for the machine is captured. This new read supersedes the read captured on 13 Feb, and that read is now failed permanently. The new read itself is failed because it is too early to process (18 Feb < 23 Feb) but, as with the previous read, it is rescheduled to try again because the read could be used if it were inside the billing screen.
–On 23 Feb the machine is now inside the billing screen and the read from 18 Feb is successfully processed, creating a job.
In summary, Jim2 received a read on 13 Feb and another on 18 Feb, but waited until 23 Feb to process the best read available, which was from 18 Feb.
7.Automated service read minimum days – Enter number of days that a service read will be accepted after previous read.
8.Page Count URL applies only to sites linked for email submission of copy counts.
8.Ticking the Auto hide Meters when Min Charge box will auto hide meters when Min Charge hides the meter display within the invoice billing stock line (see Billing Stock macro) when the Min Charge overrides the copy count. Half ticking this box (ie. solid black box) will show the customer the meter lines on the job, however they won't see the breakdown between meters and the Min Charge meter.
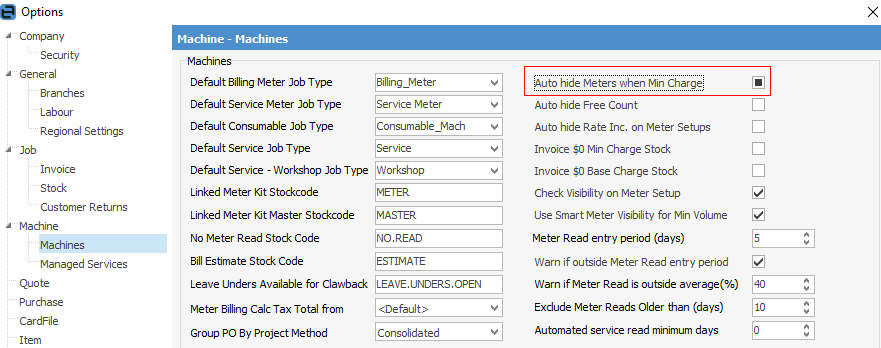
Note: This will only work when new invoices are generated. It will not work on previously generated invoices.
9.Check Visibility on Meter Setup – If this is ticked, the overall rule says if it is billable to the client at a non zero rate the charge should be visible, otherwise it should be hidden. This means:
▪Non-billable meter stock, codes are normally hidden.
▪Meter stock codes billed at $0 are normally hidden.
▪Standard and over charges on master contracts are normally hidden, as these are tracking-only meters billed at $0.
Unticking this will turn off all warning pop-ups.
10.Use Smart Meter Visibility for Min Volume is by default ticked. Unticking will ensure that Min Volume (standard and unders stock code) visibility will be used without being overridden.
To further clarify, Smart Meter Visibility activates in the following situations:
▪The standard, unders and overs are all billed to the same customer.
▪The overs in the meter setup are set to Show or Hide Price.
▪The standard and unders are set to Hide,
▪The billed amount does not reach the minimum volume.
▪Use Smart Meter Visibility is ticked in Options > Machines.
In this case, Jim2 overrides the normal setting and makes the standard and unders stock visible. This is a common requirement if the client is charged overs so they should just see the overs quantity. However, if they are not charged overs they should be shown the minimum volume (standard + unders) quantities, which are typically billed at zero.
11.The Group PO by Project Method offers choices for customers using third party PO meters to account for contractor service agent costs on a machine. Jim2 can create a consolidated, separate third party PO per single machine, or even per master machine. This is a global setting and can be overridden by a the Group PO By Project Method setting on the Vendor tab of the card file. In particular cases, a contractor could be set up for single third party POs for each machine or master.
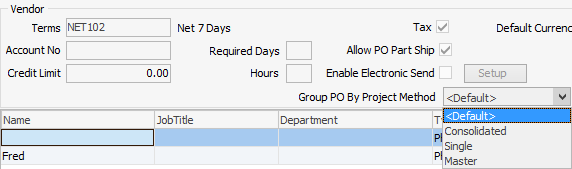
▪Consolidated – All purchase order lines for a particular period are added to the same purchase order.
▪Single – Each machine has its own purchase order created.
▪Master – Machines of a single master machine will be added to their own purchase order. Standalone machines are treated as though the setting is Single.
12.Tick the appropriate boxes to enable Auto hide Meters when Min Charge, Auto hide Free Count, Auto hide Rate Inc. on Meter Setups, Invoice $0 Min Charge Stock, Invoice $0 Base Charge Stock.
See Macros for more detail on this section.
Further information: