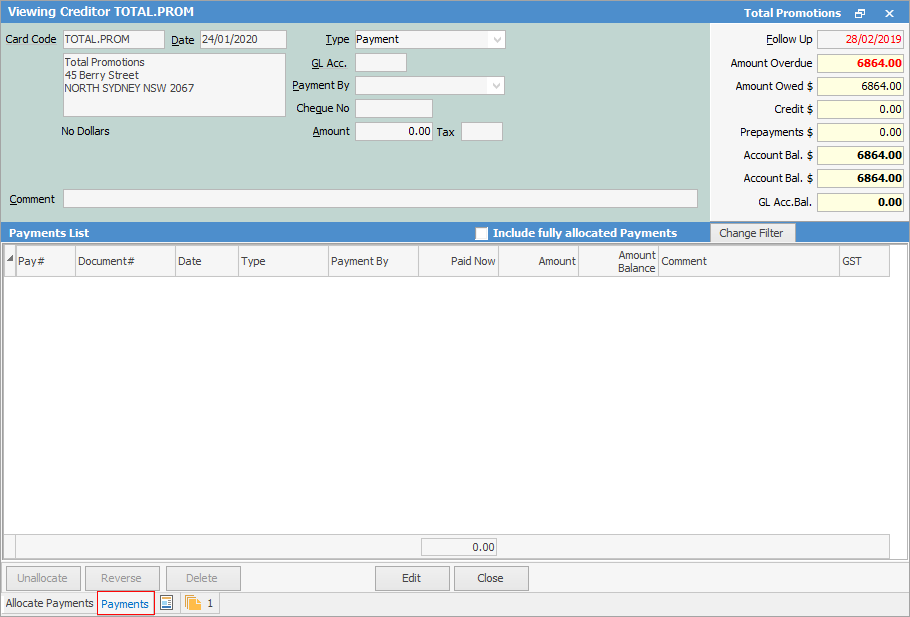
From the Payments tab, which invoice(s) a payment was applied to can be seen, along with the date the payment was applied.
The date a payment was applied may be different to the actual payment date.
This is important as it can impact on the Aged Payables report (accessible from within a Creditors list). For example, a payment has been made but not applied to the invoices, therefore on the reports the invoices will show as owing and perhaps overdue, however there will be a credit showing in the month for the amount of that payment.
The default view shows only unallocated payments and/or credits (eg. returns or contras).

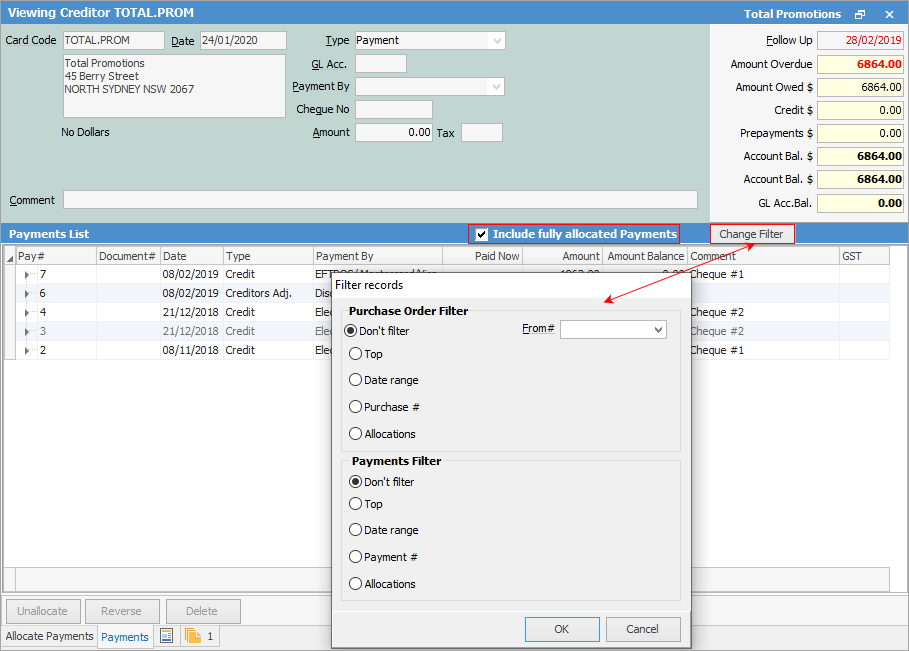
To view all payments and credits go to the Payments tab and tick Include fully allocated Payments. Filter the view by clicking Change Filter and selecting criteria as required.

 |
Note: The From# field only relates to central billing. |
Clicking the  to the left of a payment that has been applied to invoices, will show details of the invoices, and the date the payment was applied to those invoices. In the expanded view below, there are two dates. The first is the date of the credit, which is the actual payment. The second is the date the payment was applied to the invoices, which may or may not be a different date.

This will provide a payment history for that creditor showing:
Field |
Explanation |
Note |
||
|---|---|---|---|---|
Pay# |
Payment number. |
This number is automatically generated by Jim2 when a payment is entered. |
||
Document# |
Either purchase order number or return to vendor number. |
|||
Date |
Date of payment entry. |
|||
Type |
Type of entry: credit, payment, prepayment, refund, etc. |
|||
Payment By |
Type of payment: cash, cheque, etc. |
|||
Amount |
The amount of the entry. |
|||
Amount Bal. |
The amount remaining on that payment to be allocated. |
|||
Comment |
Any comments attached to that entry. |
|
The following options are also available:
Option |
Explanation |
|---|---|
|
Click the arrow |
Include fully allocated Payments |
Tick to show fully allocated payments. |
Unallocate |
Click this to unallocate a payment from a purchase. |
Reverse |
Click to reverse account fees and discounts. |
Delete |
Delete any unallocated creditors payments (once the actual payment has been cancelled via Banking > Cheque book). |
 |
Unallocating, reversing and deleting are all controlled by security. |
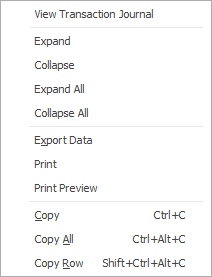
Right click options

Right Click Option |
Function |
|---|---|
View Transaction Journal |
View the highlighted in the Transaction Journal. |
Expand/Collapse |
Expand will show entries below the line, collapse will hide them. |
Export Data |
Export data to a spreadsheet. |
Prints everything within the grid. |
|
Print Preview |
Preview how the list will be printed. Within this area you can change the orientation of the page. For instance, if there are more columns than will fit on a portrait page, change it to landscape. |
Copy |
Copy the highlighted cell. |
Copy Row |
Copy the entire highlighted row. |
Copy All |
Copy all, which can then be pasted into a spreadsheet |
Further information
Creditors Allocate Payments Grid
Creditors Adjustments Up and Down
Discounts and Account Fee entries
Manage Payment Returned from Bank