

 |
Note: The above area is controlled by CardFile Security. If Edit Customer Details is unticked, you will not be able to make changes here. |
1.Go to the Customer tab at the bottom of the CardFile form and click Edit.
2.Add relevant information into the fields on the form. The purpose of each field is detailed below.
Name |
Purpose/Usage |
||
|---|---|---|---|
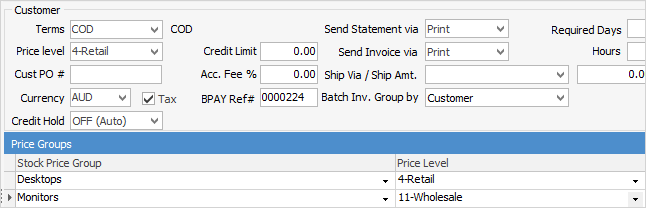
Terms |
The payment terms for this customer. Choose from the dropdown options that are set up in Tools > Setups > CardFiles > Payment Terms. |
||
Price level |
This allows adding exceptions to the customer's default price level. In the Stock Price Group grid, add the price group (as set up in group types) and the price level for that group. Not all the price groups need to be added – just the exceptions to the customer's default price level.
 |
||
Cust PO # |
If there is a standing order number from a customer which is to display on every invoice, enter the order number into this field.
This is not related to the Ref# field on a job – it is only related to an invoice. This not a mandatory field. |
||
Currency |
This will always be the default currency unless the company is licensed for the Multicurrency feature option as part of the Jim2 subscription. |
||
Tax |
The Tax box should be ticked if the country has GST, as the customer should be paying GST on the majority of purchases. This can be altered on each job/invoice, as this is only a default setting. |
||
Credit Hold |
From time to time a customer may need to be put on credit hold. This can be performed manually, but it can be performed automatically if Auto Credit Hold is enabled in Options. Once triggered, Jim2 will warn the user every time they try to invoice that customer with a message advising that the customer is on credit hold. The user can still choose to proceed with the invoice, but only if their security level permits. See CardFile Credit Hold Settings below, for more information.
When adding a job, a warning will pop up and the Cust# field will turn pale red. If the customer is placed on credit hold after jobs have been created, the field will change colour, however no warning will pop up. |
||
Credit Limit |
Enter the amount of credit that this customer can accrue before being placed on credit hold. This amount can be changed at any time. If left blank, no credit limit will be set. |
||
Acc. Fee % |
To charge customers an account fee which varies from the percentage entered into their selected payment terms, enter a percentage here. This will overwrite the default percentage when invoicing this customer. |
||
BPAY Ref# |
This is the unique BPAY Ref# for that specific customer. By being specific to a customer, rather than an invoice, this allows customers to pay multiple invoices in one BPAY transaction, and avoids the problem of the BPAY Ref# changing each time a customer uses BPAY. The BPAY Ref# uses the standard Modular 10 encoding. Note that Use BPAY must be ticked in Tools > Options > Job > Invoice for this tab to appear. |
||
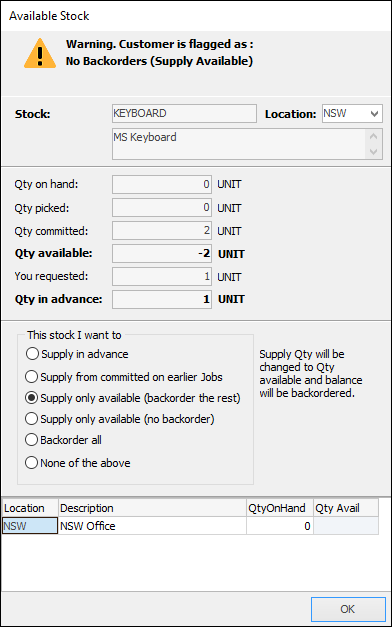
Back order |
This determines how a customer wants to handle back orders. There is a default setting within Options, however this will override that setting.
The Back order setting has the following options: ▪Allow Backorders ▪No Backorders (Supply available) ▪No Part Ship (Supply requested quantity)
The Available Stock screen will indicate the customer's nominated back order setting:
The default back order setting can be overridden at point of generating the back order by ticking Acknowledge:
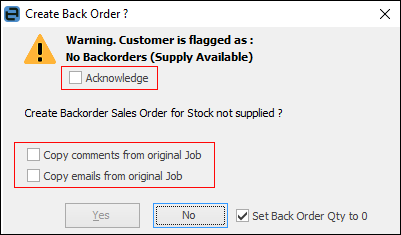
Comments and emails can also be copied from the job to the back order via this screen. |
||
Send Statement via |
Choose which method to use for the distribution of customer statements – Email & Print, Print, Fax, Email, or Don't Send. Faxing requires fax software to be installed. Zetafax is recommended.
Note: Print Invoice after invoicing a job must be ticked under Tools > Job > Invoice, remembering that Print also means to email or fax. If this is not ticked, the statement cannot be emailed. |
||
Send Invoice via |
Choose which method to use for the distribution of customer invoices – Email & Print, Print, Fax, Email, or Don't Send. Faxing requires installation of suitable software. Zetafax is recommended.
Note: Print Invoice after invoicing a job must be ticked under Tools > Job > Invoice, remembering that Print also means to email or fax. If this is not ticked, the invoice cannot be emailed. |
||
Tax |
Ticked indicates that tax (GST) is paid by the customer. Unticked indicates that tax is not paid by the customer. |
||
Ship Via Ship $ |
Enter the customer's preferred delivery method and the default charge in the Ship $ field. The customer's invoice will show these details in the Shipped Via details of the invoice.
Note: Ship $ does not appear on a job total, only on the final invoice.
|
||
Batch Inv. Group By |
Jobs can be batch invoiced by the method chosen here. For example, choosing Customer means that all jobs for the same customer will appear on one invoice. The choices are Customer, Ship, Customer Ref# or Don't Group. |
||
Required Days Hours |
A customer's turnaround time may be different to the normal turnaround time as set up in Job Options. This turnaround time can be changed for this particular customer by entering their turnaround time in the Required Days and Hours fields.
Job Due Date Not Changing Unless required, do not enter zeroes in these fields if Job Options are to override the cardfile. If any 0 is entered in either field, this will override the Job Options, and will not change the due date. |
3.Click Save or Save & Close to save these details immediately, or select any other applicable tabs and enter more details, in order to complete this cardfile.
The Credit Hold field allows selecting the following options.
Credit Hold |
Description |
|---|---|
Off (Auto) |
The customer is currently not on credit hold. This is the default setting. |
On (Auto) |
The customer has been placed on automatic credit hold. They will return to (Off) Auto when payment is made. |
Off (Manual) |
The customer is off credit hold and is not affected by auto credit hold checking. |
On (Manual) |
The customer is on credit hold and is not affected by auto credit hold checking. |