|
The Vendor tab will not appear until Vendor has been ticked in the CardFile header (top right).
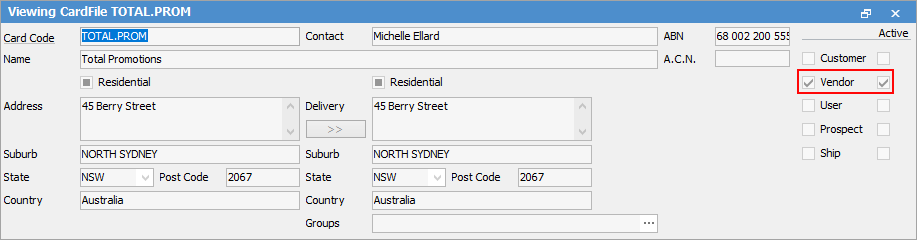 |


1.Go to the Vendor tab at the bottom of the CardFile form, then click Edit.
2.Add relevant information into the fields on the form. The purpose of each field is detailed below.
Field |
Explanation |
|---|---|
Terms |
This field is used to add vendor terms, eg. COD, Net 7 Days, etc. The drop down options are the CardFile Payment Terms as defined in Tools > Setups > CardFiles > Payment Terms. |
Account No |
Enter the account number (payment reference or creditor reference) for this vendor (maximum 15 characters), if applicable. |
Credit Limit |
If there is a credit limit with the vendor, enter it in this field. The credit limit shows in the Creditors list, and the creditor record will show as red in the list if the amount owed to them exceeds this amount. |
Required Days Hours |
Record the number of days and/or hours normally expected to receive an order after it is placed. Jim2 will automatically calculate the date due on any purchase orders to that vendor. |
Tax |
The Tax box should be ticked if the country is Australia, as GST should be paid to the supplier on the majority of purchases. This can be altered on each purchase/expense order, as this is only a default setting. |
Allow PO Part Ship |
Tick to allow this vendor to ship part of an order. If not ticked, part shipments will not be allowed. |
Enable Electronic Send |
Tick to permit the electronic sending of purchase orders to this vendor. This is an optional (licensed) feature, that may not be enabled in the company's version of Jim2. Click the Setup button beside this checkbox to add parameters.
Within a purchase order there will be a button called eSend for sending electronically. |
|
If Enable Electronic Send is ticked, use this button to set up the Electronic PO Parameters for this vendor.
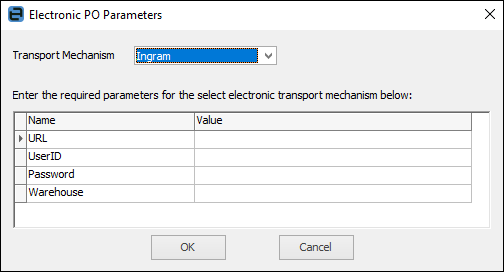
This enables users to send purchase orders electronically to vendors. To use this feature, the eBusiness Connect feature is required, as well as a vendor that can receiving electronic purchase orders. |
Group PO By Project Method |
Choose one of these options: <Default> – Applies the default settings from Tools > Options > Project > Machine. (Project may have been renamed to Contract, Machine, Agreement, etc. in your database.) 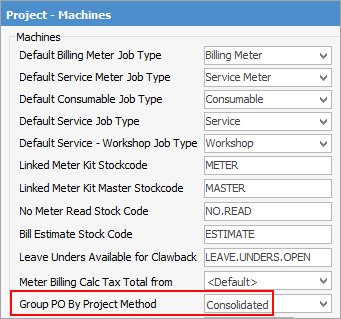 Consolidated – Billing for all CPC contracts where the Vendor# and the month of the due date are the same, and there is a purchase order on Booked status will be consolidated to a single purchase order. Single – Billing for all CPC will be on a single purchase order for all devices and contracts. Master, Standalone Consolidated – Billing for all CPC contracts where the Vendor# and the month of the due date are the same, and there is a PO on Booked status will be consolidated to a single purchase order for contracts that have a Master and child. For contracts that do not include a master, purchase orders will be consolidated for all individual contracts as per Consolidated above. Master, Standalone Single – Billing for all CPC contracts where the Vendor# and the month of the due date are the same, and there is a purchase order on Booked status will be consolidated to a single purchase order for contracts that have a master and child. For contracts that do not include a master, purchase orders will be singular for all individual contracts, as per Single above.
This selection is only relevant for sites using Managed Print Services. |
Default Currency |
This will always be the home currency, unless the Multi-Currency feature is part of the company's Jim2 subscription. |

3.Click Save or Save & Close to save these details, or enter more details on any other applicable tabs in order to complete this cardfile.
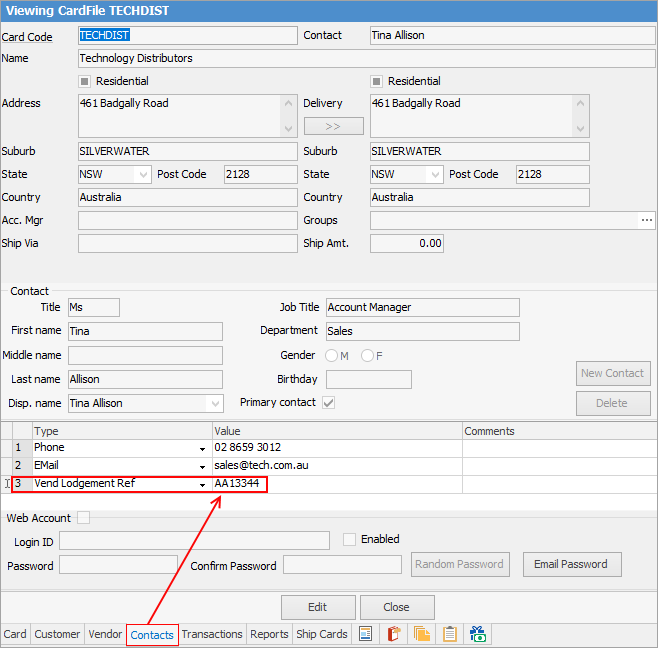
On the Contacts tab of a Vendor, enter a vendor lodgement reference number for electronic banking purposes. This number is limited to 18 characters. A warning will pop to screen if more than 18 characters.
Further information