
The stock grid of any purchase order is designed to record and calculate the quantity and cost price of all depleting, non depleting and special stock.

If necessary, you can expand the grid to view all possible fields.

1.Select the stock grid by either:
▪Pressing the F4 function key, or
▪Clicking in the Stock Code field.
|
If adding multiple stock lines to the grid, at the end of the line pressing the Enter key will take you to the next line in the grid, ready to insert another stock code. |

2.To add stock to a purchase order, move your cursor to the Stock Code field of the stock grid and select stock in one of the following ways:
▪Press F5, or select the Stock Code ellipsis [...] to bring up the Jim2 Stock Select screen. Within this lookup you can view Qty on Hand, Back Order (Qty), etc, for any stock Item. Click OK to select the stock Item.
▪Start to type the stock code. Jim2's intuitive type will pre-empt your entry by showing possible stock codes from the stock records as you type each letter. Press F5 to open the Stock Select screen at the currently pre-empted Stock Code.
▪Scan the Stock Barcode to automatically add the correct stock code.
|
The Jim2 Stock Select screen allows you to locate and select stock to be added to the purchase order. You can whittle down the stock list by entering some text (eg. partial stock code or description) in the search fields at the top of the screen and clicking Run. Now only stock which fits this filter will be displayed. If you then clear the search fields and click Run, you will again see all stock displayed within the stock grid. For more information see the Purchase/Expense Comment grid section. |

•Click on the Load Stock to PO icon (this needs to be enabled via Tools > Menu Scripts:

This will bring up the Load Stock onto PO screen, which will allow you to load stock to the PO via a CSV spreadsheet.
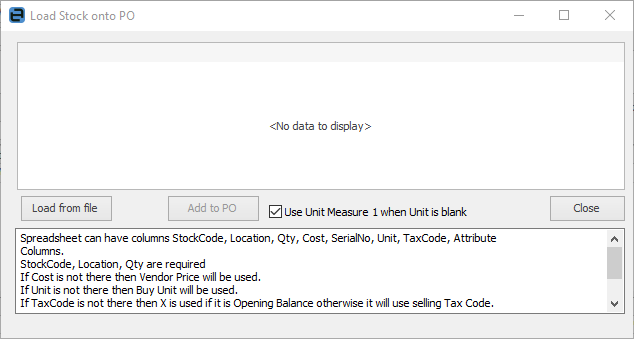
The lower area of the screen explains columns required and how cost etc will be used. Using this process, jobs will not be linked.
3.Once you have selected the stock code, the stock Description field will be filled in automatically. If you have selected Serial on Purchase on the stock record, to add serialised stock, you need to enter a serial number (if required) by selecting the ellipsis [...] next to Description. Enter a job number if required. The parts will be added to that job automatically, and show the status of the purchase order.
|
If you are purchasing, or have purchased stock for a job, you can add it to that job by entering the job number in the Job# field of the stock grid. If necessary, expand the stock grid fields by selecting the |
4.Select the unit measure of the stock being purchased, and enter the quantity ordered from the vendor.
5.The stock grid will pick up the default stock location for purchases as set in the user's card file, or you can specify a different stock location if required. You are able within this stock grid to select another location – to view this area of the grid click the arrow  in top left-hand corner of that grid and it will show the expanded view.
|
There are a number of functions available if you right click within the stock grid – for more information see the purchase order stock grid section. |
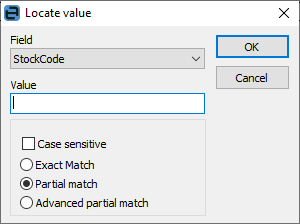
Within the stock grid, you can search all columns and rows by selecting Ctrl+S. This will bring up the Locate value screen, where you can select which field to search, enter the text to search for in the Value field.
Further information: