
Master machines are contracts based on a total minimum charge or page count for meters of multiple machines.
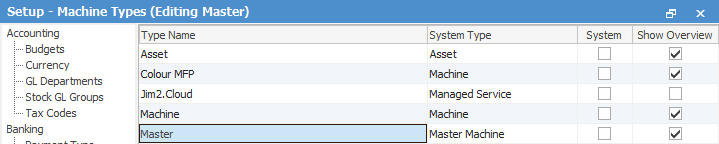
1.Set up a Machine Type of Master:
•On the ribbon, go to Tools > Setups > Machines > Machine Types, click Add.
•Type Name Master, System Type Master Machine.
2.We will be creating a master contract, and will need to link the contract to an Item. As the master contract could be for a range of different machine models, we need to add an extra Item for the master contract. On the ribbon, go to Items > Add Item and add a new Master Machine as per below:

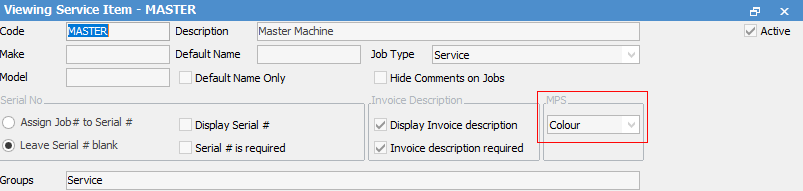
As the Master Machine may reflect a range of machines, it doesn't need to be serialised. This Item will more than likely be used for many different MPS contracts, which may contain black and/or colour machines, so for the Master Item we will set the photocopier type to colour so that the contract can reflect both types.
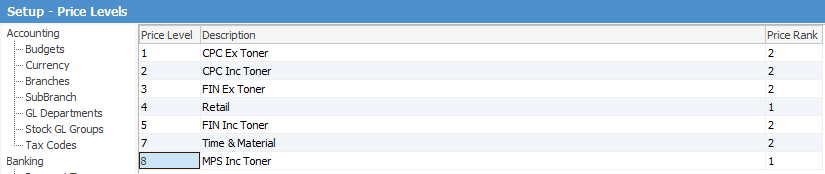
3.Now we need to add a new contract price level for our MPS contract. On the ribbon, go to Tools > Setups > CardFiles > Price Levels and add a new price level for MPS Contracts:
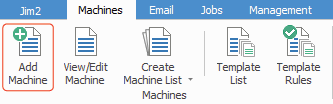
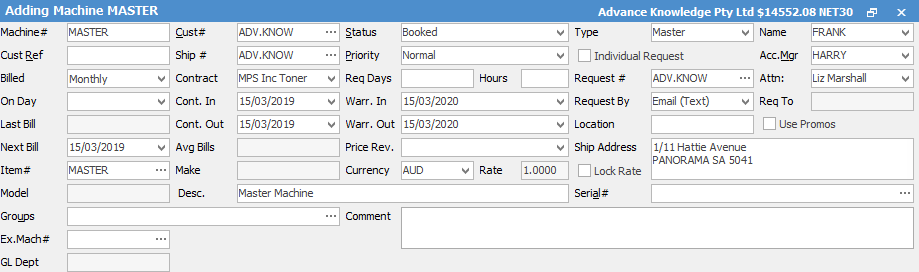
4.On the ribbon, go to Machines > Add Machine, and enter all fields necessary.
5.Note that the Type on this machine is Master, and the Item is Master, both of which we've just created above. Minimum fields:
▪Enter Machine#. (This field will populate automatically, however you can change the machine number.)
▪Enter Cust# as required.
▪Select Type Master.
▪Contract – enter the required Price Level.
▪Next Bill should be the next billing date for all machines this is the master for.
▪Enter Item# as required.
|
You will see some letters underlined in the field names within the header, eg. Cust#. Using Alt+ the underlined letter will jump you to the field beside that heading. |

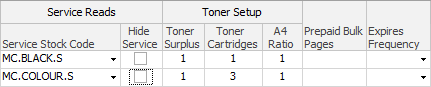
6.Select the Meter Setup tab at the bottom of the screen. We will now create a master meter setup that will apply to all child machines. Note that Jim2 displays in column 1 a Master Meter tick box. This determines whether Jim2 should copy this meter setup down to all child machines or not. In most cases this is required, however if your child machines have different rates, this box may need to be unticked. In this example, we will select the tick box for Master Meter for both black and colour.

Now, enter unders/overs billing information on the meter setup line of the master contract, including the minimum volume that is specified for all child machines of the contract. This is the total for all machines on the contract, and in this example the customer is contractually bound to 10,000 black pages and 2,500 colour pages each month.

Finally, we enter our remaining meter setup columns for service stock reads.
Click Save, and you will be presented with the following screen:
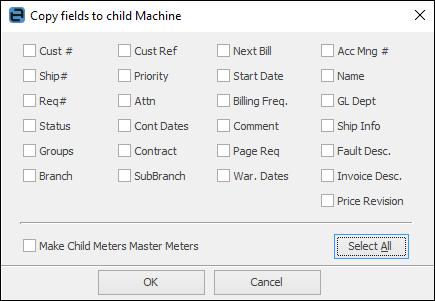
If ticked, Jim2 will copy the selected field values from the master contract to the child contracts.
There are a number of fields you might wish to tick to ensure the master and children are set up the same.
The Make Child Meters Master Meters tick box will check if the child machine has the same meter billing stock code, and if so it will make the Meter line on the child set by the master, which will effectively copy the meters down from the master and replace the current ones on the child machine.
As mentioned above, if a master has a meter ticked as a Master Meter, that meter will be copied down to all child machines.
On these child machines, by default Master Meter will also be ticked. Any change you make to the meter on the master will be automatically copied down to the child machines. There is no need to tick any of the boxes when saving the master, when both master and child have Master Meter ticked – they will be automatically kept in sync.
All child machines now have the option of unticking this Master Meter tick box for this meter. This tells Jim that, for this particular machine do not update this meter automatically when the meter on the master changes. This can be useful if you have a contract where a particular machine has a black meter, but it is charged at a different rate to all the other machines. In other words, unticking Master Meter allows the child to control exactly what is billed for that machine.
If you tick Make Child Meters Master Meters this turns the Master Meter tick back on for any child machine that had unticked it, thereby ensuring that the meter is again controlled by the master.
At this stage, we don't have any child contracts to copy down to, so just click OK.
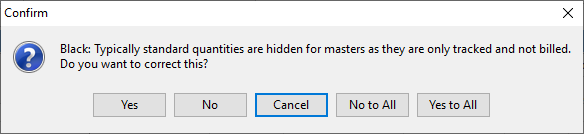
This relates to Check Visibility on Meter Setup as set up via Tools > Options > Machines > Machine. If the check is performed, the overall rule says that, if it is billable to the client at a non-zero rate, the charge should be visible – otherwise it should be hidden. This means that standard and over charges on master contracts are normally hidden, as these are tracking-only meters billed at $0. Click Yes to All in this instance to apply the rule.
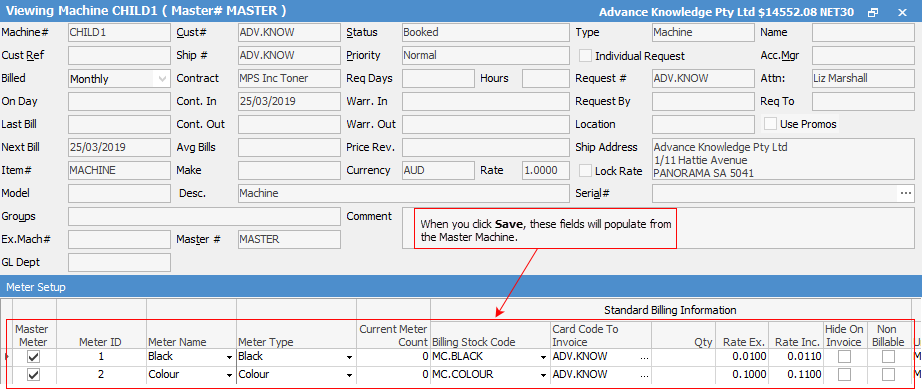
7.Create a child machine for each machine that is part of the contract. Concentrate on filling in values on the child machine that are required/unique, such as Cust#, Project Type, Item, Serial Number. The master can copy down fields such as Contract Type, Contract Start/End, Warranty Start/End and Request fields. In the Master# field, enter the number of the master contract. You can always link back to the master contract by selecting the hyperlink next to the Master# field.

Click Save, then Edit and the child machine meter setup will be populated with the master machine's information.
Aside from the fact that this makes it much easier to set up a master with many children linked to it, we can now be confident that the machines under the master contract are all set up in the same way.
Additionally, the master is now the dominant record of all the child machines' meter setups, so any rate changes will be copied down to all child machines when the master is edited and saved, making variations much easier to administer.
|
By default, you will not be prompted to enter opening balances when saving the master. You can manually enter the current meter count for all meters by going to the Open Balance tab on the bottom of the form.
Once there is billing against the child machines, you are not able to unlink them from the Master machine. You need to Finish the child machines and create similar if you wish to have them as stand alone machines.
The child machine history will be against the Finished machine, however the Service History Report looks at the Item and Serial#, so all instances relating to Serial# should be included in the report. |

Further information: